
Toyota Corolla (E120) 2002–2008 Repair Manual / Engine hood/door / Luggage door hinge torsion bar rh
Toyota Corolla (E120): Luggage door hinge torsion bar rh
Replacement
Hint
:
- installation is in the reverse order of the removal. But the installation is indicated only when it has a point.
- In the lh side, work in the same procedure as in the rh side.
- Since the removal of the torsion bar will cause no tension, operation of opening and closing the door should be carried out holding the door by hand in order to prevent the door from closing without any resistance.
- Rh side torsion bar is in the upper side and lh side torsion bar is in the lower side, thus the installation should be done in the order of rh to lh, and the removal should be done in the order of lh to rh.
1. Remove luggage door hinge torsion bar rh
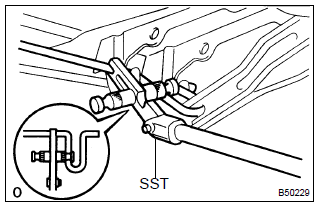
- Remove the torsion bars from the center bracket.
- install sst to the torsion bar on the hinge side.
Sst 09804–24010
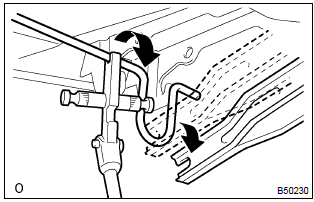
- Push down the sst, and pull the luggage compartment door hinge from the torsion bar.
- slowly lift the sst, and remove the torsion bar from the torsion bar bracket with sst.
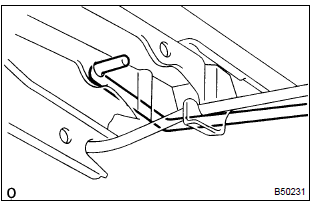
- Disconnect the torsion bar from the bracket.
- employ the same manner described above to the other side.
2. Install luggage door hinge torsion bar rh
- when installing the torsion bar, be sure to install it to the clamp securely.


Other materials:
Phone screen
To display the screen shown below, press the
switch on the steering wheel or the
button.
Several functions are available to operate on each screen that is displayed by
selecting the 4 tabs.
1 Device name
2 Bluetooth® connection status
■ Telephone switch
■ Microphone
υ ...
Circuit inspection
1 Check d squib circuit(airbag sensor assy center – horn button
assy)
Disconnect the negative (–) terminal cable from the battery,
and wait at least for 90 seconds.
disconnect the connectors between the airbag sensor
assy center and the horn button assy.
connect the ...
Radiator assy
Replacement
1. Drain coolant
2. Separate radiator hose inlet
3. Separate radiator hose outlet
4. Separate oil cooler inlet tube no.1
5. Separate oil cooler outlet tube no.1
6. Remove radiator assy
disconnect the fan motor connector.
disconnect two clamps for wire–harness fr ...