
Toyota Corolla (E170): Indicators
The indicators inform the driver of the operating state of the vehicle’s various systems.
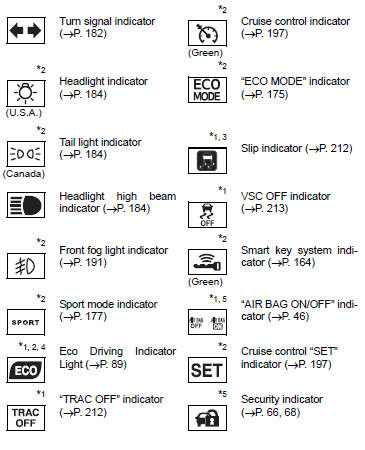
*1: Vehicles without a smart key system: These lights turn on when the engine switch is turned to the “ON” position to indicate that a system check is being performed. They will turn off after the engine is started, or after a few seconds. There may be a malfunction in a system if a light does not come on, or if the lights do not turn off. Have the vehicle inspected by your Toyota dealer.
Vehicles with a smart key system: These lights turn on when the engine switch is turned to IGNITION ON mode to indicate that a system check is being performed. They will turn off after the engine is started, or after a few seconds. There may be a malfunction in a system if a light does not come on, or if the lights do not turn off. Have the vehicle inspected by your Toyota dealer.
*2: If equipped
*3: The light flashes to indicate that the system is operating.
*4: The light does not turn on when the system is disabled.
*5: This light illuminates on the center panel.
CAUTION
■If a safety system warning light does not come on
Should a safety system light such as the ABS and SRS warning lights not come on when you start the engine, this could mean that these systems are not available to help protect you in an accident, which could result in death or serious injury. Have the vehicle inspected by your Toyota dealer immediately if this occurs.


Other materials:
Exterior
Doors
Locking/unlocking
Opening/closing the side windows
Locking/unlocking by using the mechanical key*1
Warning messages
Trunk
Opening from inside
Opening from outside
Warning messages
Outside rear view mirrors
Adjusting the mirror angle
Folding the mirrors
Defogging the mirrors*2
...
Replacement
1. Drain engine oil
remove the oil pan drain plug and drain the engine oil.
2. Removal & installation chain sub–assy
3. Remove chain vibration damper no.1
remove 2 bolts and chain vibration damper no. 1.
4. Remove oil pump assy
Remove the 5 bolts.
rem ...
Confirmation driving pattern
Connect the hand–held tester or the obd ii scan tool to the dlc3.
record dtcs and the freeze frame data.
set the check mode using the hand–held tester .
read the value on the misfire counter for each cylinder when
idling. If the value is displayed on the
misfire c ...