Toyota Corolla (E120) 2002–2008 Repair Manual / Diagnostics / Combination meter / How to proceed with troubleshooting
Toyota Corolla (E120): How to proceed with troubleshooting
1 Vehicle brought to workshop

2 Customer problem analysis

3 Problem symptom confirmation

4 Circuit inspection

5 Repair or replace

6 Confirmation test

7 End
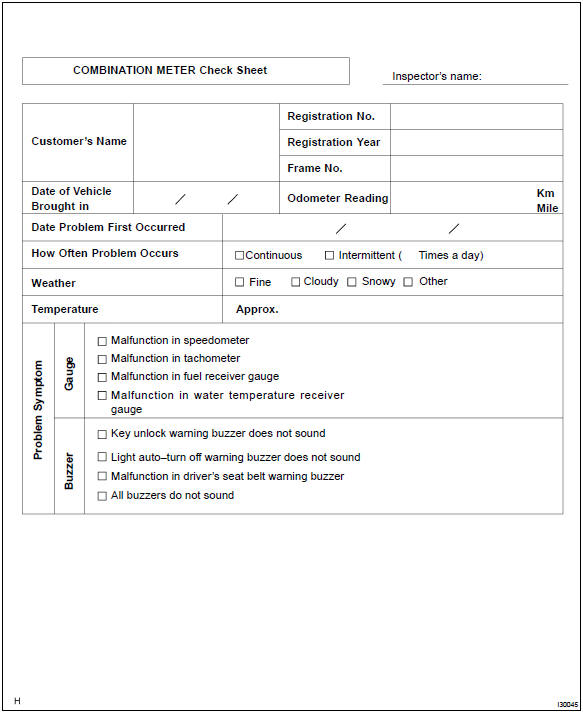
Customer problem analysis check


Other materials:
Adjustment
1. Put vehicle these conditions
tire inflation pressure is the specified value .
start the engine.
2. Adjust fog light aim
The fog light aim can be adjusting by moving the aiming
screw in the vertical direction.
Hint:
the optical aim moves upward when turning a scr ...
Disabling the TRAC system
If the vehicle gets stuck in mud, dirt or snow, the TRAC system may reduce power
from the engine to the wheels. Pressing
to turn the system off may make it
easier for you to rock the vehicle in order to free it.
To turn the TRAC system off, quickly press and release
.
The “TRAC OFF” ind ...
Transmission valve body assy (atm)
Replacement
1. Remove engine under cover lh
2. Drain automatic transaxle fluid
remove the drain plug, gasket and drain atf.
install a new gasket and drain plug.
Torque: 17.5 Nvm (178 Kgf·cm, 13 ft·lbf)
3. Remove automatic transaxle oil pan sub–assy
Remove the 18 ...