Toyota Corolla (E170) 2014–2019 Owners Manual / Operation of each component / Adjusting the seats / Outside rear view mirrors / Folding the mirrors
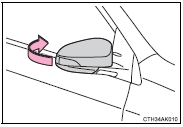
Toyota Corolla (E170): Folding the mirrors
Push the mirror back in the direction of the vehicle’s rear.
■Mirror angle can be adjusted when
► Vehicles without a smart key system The engine switch is in the “ACC” or “ON” position.
►Vehicles with a smart key system The engine switch is in ACCESSORY or IGNITION ON mode.
■When the mirrors are fogged up (if equipped)
The outside rear view mirrors can be cleared using the mirror defoggers. Turn on the rear window defogger to turn on the outside rear view mirror defoggers.
CAUTION
■Important points while driving
Observe the following precautions while driving.
Failure to do so may result in loss of control of the vehicle and cause an accident, resulting in death or serious injury.
●Do not adjust the mirrors while driving.
●Do not drive with the mirrors folded.
●Both the driver and passenger side mirrors must be extended and properly adjusted before driving.
■When a mirror is moving
To avoid personal injury and mirror malfunction, be careful not to get your hand caught by the moving mirror.
■When the mirror defoggers are operating (if equipped
) Do not touch the rear view mirror surfaces, as they can become very hot and burn you.


Other materials:
Inspection procedure
1 Inspect skid control ecu connector(+bs terminal voltage)
Disconnect the skid control ecu connector.
measure the voltage between terminals +bs (2) and gnd
(1, 23) of skid control ecu harness side connector.
Voltage: 10 – 14 v
2 Reconfirm dtc
Check the dtc .
Ok :
...
Circuit description
The d squib circuit consists of the airbag sensor assy center, spiral cable
sub–assy and horn button assy.
It causes the srs to deploy when the srs deployment conditions are satisfied.
Dtc b0100/13 is recorded when a short is detected in the d squib circuit.
Wiring diagram
...
Inspection procedure
Hint
Advanced timing over
(valve timing is out of specified range)
P0011
Retarded timing over
(valve timing is out of specified range)
P0012
If dtc p0011 or p0012 is displayed, check the vvt system circuit.
Read freeze frame data using the hand–held tester o ...