Toyota Corolla (E120): Adjustment
Hint
:
- in the rh side, work in the same procedure as in the lh side.
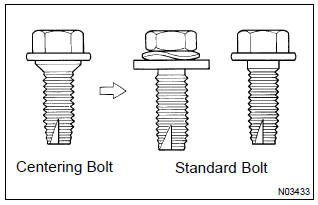
- Since the centering bolt is used as a door side hinge bolt, the door hinge cannot be adjusted with it on. Substitute the bolt with washer for the centering bolt.
1. Inspect rear door panel sub–assy lh
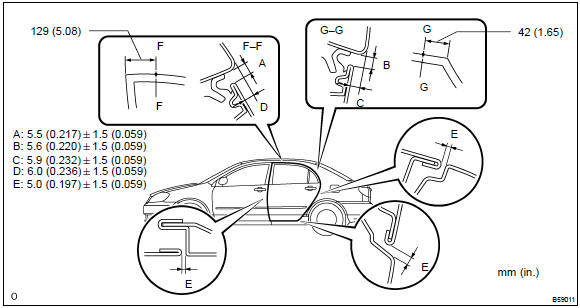
- Check that the clearance is within the standard value
2. Remove front door scuff plate lh
3. Remove rear door scuff plate lh
4. Remove front door weatherstrip lh
5. Remove rear door weatherstrip lh
6. Remove center pillar garnish lower lh
7. Adjust rear door panel sub–assy lh
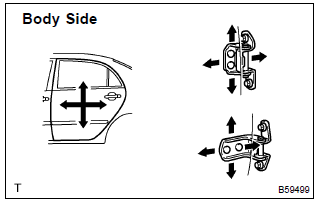
- Adjust the door by loosening the body side hinge nuts.
Torque: 26 nvm (265 kgfvcm, 19 ftvlbf)
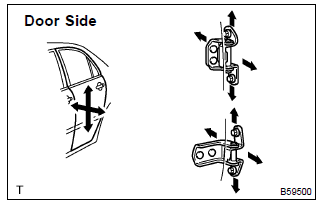
- Adjust the door by loosening the door side hinge bolts.
Torque: 26 nvm (265 kgfvcm, 19 ftvlbf)
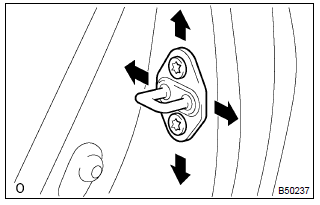
- Adjust the striker position by slightly loosening the striker mounting screws, and hitting the striker with a plastic hammer.
- tighten the striker mounting screws again.
Torque: 23 nvm (235 kgfvcm, 17 ftvlbf)


Other materials:
Listening to an iPod
Connecting an iPod enables you to enjoy music from the vehicle speakers. Press
until “iPod” is displayed.
Connecting an iPod
Control panel
1 Power
2 Volume
3 Fast-forward or reverse
4 Repeat play
5 Shuffle playback
6 Select an iPod menu/song or display song list
7 Displays text mess ...
Wiring diagram
1 Inspect terminal voltage(pi)
(a) turn
Turn the ignition switch to on.
measure voltage between terminal 5 (pi) of cruise control
ecu assy and body ground, when the cruise control main
switch button is on and off.
Ok:
2 Inspect combination meter assy
3 Check harn ...
Operating the touch screen
By touching the screen with your finger, you can control the multimedia system,
etc.
■ Drag*
Touch the screen with your finger, and move the screen to the desired position.
● Scrolling the lists
● Using scroll bar in lists
■ Flick*
Touch the screen with your finger an ...