Toyota Corolla (E120): Replacement
1. Remove battery
2. Remove battery carrier
- Remove the 4 bolts and battery carrier.
3. Disconnect floor shift cable transmission control shift
- Remove the nut from the control shaft lever.
- disconnect the control cable from the control shaft lever.
- remove the clip and disconnect the control cable from the control cable bracket.
4. Remove park/neutral position switch assy
- Disconnect the park/neutral position switch connector.
- remove the nut, washer and control shaft lever.
- pry out the lock plate and remove the manual valve shaft nut.
- remove the 2 bolts and pull out the park/neutral position switch.
5. Install park/neutral position switch assy
- Install the park/neutral position switch to the manual valve shaft.
- temporarily install the 2 bolts.
- place a new lock plate and tighten the nut.
Torque: 5.5 Nvm (56 Kgf·cm, 49 in.Vlbf)
- temporarily install the control shaft lever.
- Turn the lever counterclockwise until it stops, then turn it clockwise 2 notches.
- remove the control shaft lever.
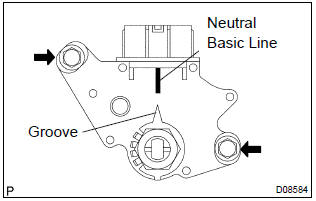
- Align the groove with neutral basic line.
- hold the switch in position and tighten the 2 bolts.
Torque: 5.5 Nvm (56 Kgf·cm, 49 in.Vlbf)
- Using a screwdriver, stake the nut with the lock plate.
- Install the control shaft lever, washer and nut.
Torque: 12.5 Nvm (127 Kgf·cm, 9 ft·lbf)
- connect the park/neutral position switch connector.
6. Install floor shift cable transmission control shift
- Temporarily install the control cable to the control shaft lever with nut.
- install the control cable and clip to the bracket.
7. Install battery carrier
- Install the battery carrier and 4 bolts.
Torque: 13 nvm (132 Kgf·cm, 10 ft·lbf)
8. Adjust shift lever position
9. Inspect shift lever position
10. Inspect park/neutral position switch assy


Other materials:
Front passenger occupant classification
system
Your vehicle is equipped with a front passenger occupant
classification system. This system detects the conditions of
the front passenger seat and activates or deactivates the front
passenger airbag and seat cushion airbag in the front passenger
side.
System components
SRS warning light
Front pa ...
Front suspension
Service data
*1: Ground clearance of front wheel center
*2: ground clearance of lower suspension arm front bolt center
*3: ground clearance of axle beam set bolt center
*4: ground clearance of rear wheel center
Torque specification
...
If the vehicle becomes stuck
Carry out the following procedures if the tires spin or the vehicle becomes
stuck in mud, dirt or snow:
1 Stop the engine. Set the parking brake and shift the shift lever to P (automatic
transmission or continuously variable transmission) or N (manual transmission).
2 Remove the mud, snow or s ...