Toyota Corolla (E120): Replacement
1. Drain brake fluid
Notice
: wash the brake fluid off immediately if it comes into contact with any painted surface.
2. Remove air cleaner cap sub–assy
3. Remove air cleaner case sub–assy
- remove the air cleaner element, then remove the 3 bolts and air cleaner case sub–assy.
4. Remove brake master cylinder sub–assy
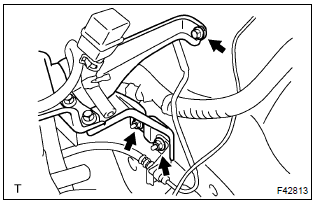
5. Disconnect brake master cylinder push rod clevis
- loosen the push rod clevis lock nut.
- remove the clip, clevis pin and wave washer.
6. Remove cruise control actuator assy (w/ cruise control)
- Remove the 2 nuts and bolt from the cruise control actuator and bracket, and move cruise control actuator aside.
7. Remove front wheel lh
8. Remove brake booster assy
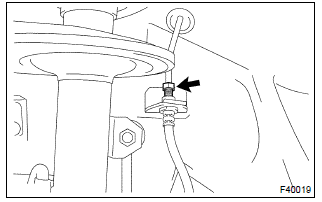
- Using sst and spanner, disconnect the brake tube from
the flexible hose, and remove the brake tube from the
body.
Sst 09023–00100
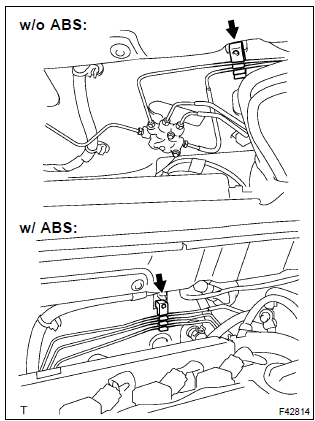
- slide the clip, disconnect the vacuum hose from the brake booster assy.
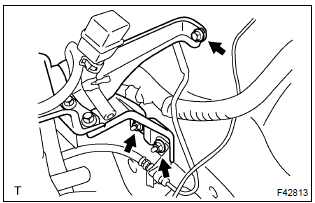
- Disconnect the 2 or 3 brake tubes from the clamp, and move brake tubes aside.
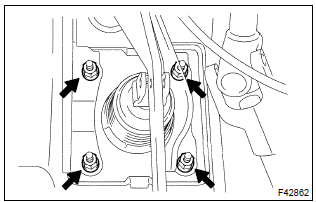
- Remove the 4 nuts and clevis.
- pull out the brake booster and gasket.
9. Install brake booster assy
- install the clevis to the booster push rod.
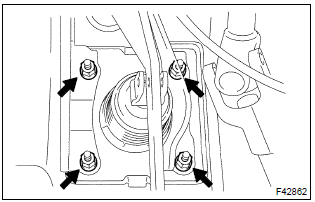
- Install a new gasket and brake booster with the 4 nuts.
Torque: 12.7 Nvm (130 Kgf·cm, 9 ft·lbf)
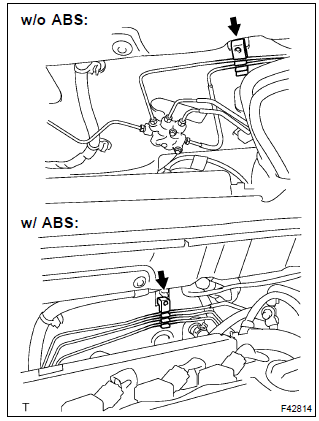
- Connect the 2 or 3 brake tubes to the clamp.
- connect the vacuum hose to the brake booster.
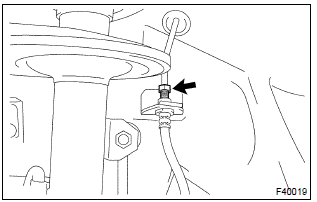
- Using sst and spanner, connect the brake tube to the
flexible hose.
Sst 09023–00100 torque: 15.2 Nvm (155 Kgf·cm, 11 ft·lbf)
10. Install front wheel lh
torque: 103 nvm (1,050 Kgf·cm, 76 ft·lbf)
11. Install cruise control actuator assy (w/ cruise control)
- Install the cruise control actuator and bracket with 2 nuts
and bolt.
Torque: 43 nvm (438 Kgf·cm, 32 ft·lbf)
12. Connect brake master cylinder push rod clevis
- apply the lithium soap base glycol grease to the push rod clevis pin.
- connect the brake master cylinder push rod clevis with the push rod clevis pin, wave washer and clip.
13. Install brake master cylinder sub–assy
14. Install air cleaner case sub–assy
- install the air cleaner case with 3 bolts, then install the air cleaner element to the air cleaner case sub– assy.
15. Install air cleaner cap sub–assy
16. Fill reservoir with brake fluid
17. Bleed master cylinder
sst 09023–00100
18. Bleed brake line
19. Check and adjust brake pedal height
20. Check pedal free play
21. Check pedal reserve distance
22. Check fluid level in reservoir
23. Check brake fluid leakage


Other materials:
Automatic transaxle assy (atm)
Precaution
The automatic transaxle is composed of highly precision–finished
parts, necessitating careful
inspection before reassembly because even a small nick could cause fluid
leakage or affect
the performance. The instructions here are organized so that you work on
only o ...
Inspection procedure
1 Inspect transmission wire(s2)
Disconnect the transmission wire connector from the
transaxle.
measure the resistance according to the value(s) in the
table below.
Standard:
2 Check harness and connector(transmission wire – ecm)
Connect the transmission connec ...
Front differential oil seal (atm)
Replacement
1. Remove front wheels
2. Remove engine under cover rh
3. Remove engine under cover lh
4. Drain automatic transaxle fluid
remove the drain plug, gasket and drain atf.
install a new gasket and drain plug.
Torque: 17.5 Nvm (178 Kgf·cm, 13 ft·lbf)
5. Remove fron ...