Toyota Corolla (E120) 2002–2008 Repair Manual / Drive shaft / propeller shaft / Drive shaft, propeller shaft, axle / Problem symptoms table
Toyota Corolla (E120): Problem symptoms table
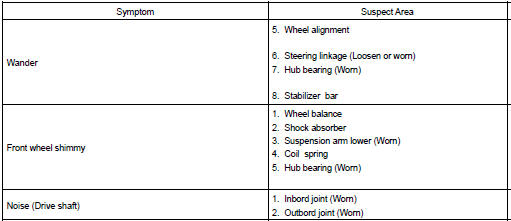
Problem symptoms table use the table below to help you find the cause of the problem. The numbers indicate the priority of the likely cause of the problem. Check each part in order. If necessary, replace these parts.


Other materials:
Driving assist systems
To help enhance driving safety and performance, the following systems operate
automatically in response to various driving situations. Be aware, however, that
these systems are supplementary and should not be relied upon too heavily when operating
the vehicle.
◆ ABS (Anti-lock Brake Sys ...
Tire & wheel
Wheel and tire system
Inspection
1. Inspect tire
check the tires for wear and proper inflation pressure.
Cold tire inflation pressure:
Using a dial indicator, check the tire runout.
Tire runout: 3.0 Mm (0.118 In.) Or less
2. Rotate tire
Hint:
see the illustration ...
Inspection procedure
1 Check harness and connector(transmission control switch –
body ground)
Disconnect the transmission control switch connector of
shift lever assy.
measure the resistance according to the value(s) in the
table below.
Standard:
2 Inspect transmission control switch
M ...