Toyota Corolla (E170) 2014–2019 Owners Manual / Interior features / Using an external device / Listening to an iPod
Toyota Corolla (E170): Listening to an iPod
Connecting an iPod enables you to enjoy music from the vehicle speakers. Press
 until “iPod” is displayed.
Connecting an iPod
Control panel
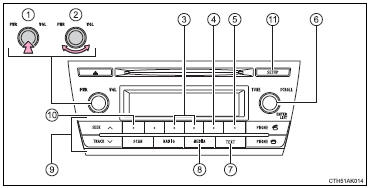
1 Power
2 Volume
3 Fast-forward or reverse
4 Repeat play
5 Shuffle playback
6 Select an iPod menu/song or display song list
7 Displays text message
8 Playback
9 Select a song
10 iPod menu mode
11 Adjust sound quality and volume balance
Selecting a play mode
1 Press  (BROWSE) to select iPod
menu mode.
(BROWSE) to select iPod
menu mode.
2 Turning  clockwise changes the
play mode in the following order:
clockwise changes the
play mode in the following order:
“Playlists”→“Artists”→“Albums”→“Songs”→“Podcasts”→“Genres” →“Composers”→“Audiobooks”
3 Press  to select the desired play
mode.
to select the desired play
mode.
■ Play mode list
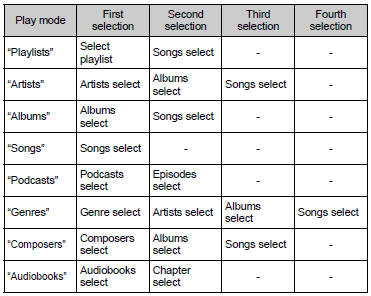
■ Selecting a list
1 Turn  to display the first selection
list.
to display the first selection
list.
2 Press  to select the desired item.
Pressing the knob changes to the second selection list.
3 Repeat the same procedure to select the desired item.
To return to the previous selection list, press
 (BACK).
Selecting a song
Turn  or press
 or
or
 to select the desired song.
Selecting a song from the song list
1 Press  .
.
The song list will be displayed.
2 Turn  to select a song.
3 Press  to play the song.
To return to the previous display, press
 (BACK).
Fast-forwarding and reversing a song
To fast-forward or reverse, press and hold
 (
( ) or
) or  (
( ).
).
Repeat play
Press  (RPT).
To cancel, press  (RPT) again.
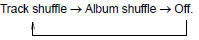
Shuffle playback
Pressing (RDM) changes the shuffle
playback mode in the following order:
Switching the display
Press  to display or hide the album
title.
to display or hide the album
title.
If there is additional text, is displayed.
Press and hold  to display the remaining
text.
to display the remaining
text.
Adjusting sound quality and volume balance
1 Press  to enter iPod menu mode.
2 Press  to change sound modes.
■About iPod

●“Made for iPod” and “Made for iPhone” mean that an electronic accessory has been designed to connect specifically to iPod, or iPhone, respectively, and has been certified by the developer to meet Apple performance standards.
●Apple is not responsible for the operation of this device or its compliance with safety and regulatory standards. Please note that the use of this accessory with iPod or iPhone may affect wireless performance.
●iPhone, iPod, iPod classic, iPod nano and iPod touch are trademarks of Apple Inc., registered in the U.S. and other countries.
■iPod functions
●When an iPod is connected and the audio source is changed to iPod mode, the iPod will resume play from the same point in which it was last used.
●Depending on the iPod that is connected to the system, certain functions may not be available. If a function is unavailable due to a malfunction (as opposed to a system specification), disconnecting the device and reconnecting it once again may resolve the problem.
●While connected to the system, the iPod cannot be operated with its own controls. It is necessary to use the controls of the vehicle’s audio system instead.
●When the battery level of an iPod is very low, the iPod may not operate. If so, charge the iPod before use.
●Supported models ■iPod problems
To resolve most problems encountered when using your iPod, disconnect your iPod from the vehicle iPod connection and reset it.
For instructions on how to reset your iPod, refer to your iPod Owner’s Manual.
■Display
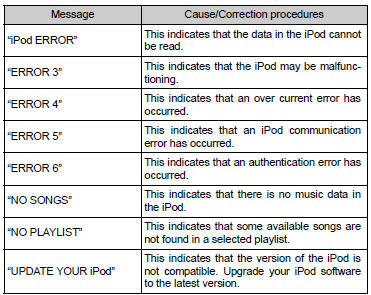
■Error messages
If an error message is displayed, refer to the following table and take the appropriate measures. If the problem is not rectified, take the vehicle to your Toyota dealer.
■Compatible models
The following iPod®, iPod nano®, iPod classic®, iPod touch® and iPhone® devices can be used with this system.
●Made for
• iPod touch (4th generation)
• iPod touch (3rd generation)
• iPod touch (2nd generation)
• iPod touch (1st generation)
• iPod classic
• iPod with video
• iPod nano (6th generation)
• iPod nano (5th generation)
• iPod nano (4th generation)
• iPod nano (3rd generation)
• iPod nano (2nd generation)
• iPod nano (1st generation)
• iPhone 4
• iPhone 3GS
• iPhone 3G
• iPhone
Depending on differences between models or software versions etc., some models might be incompatible with this system.
Items related to standards and limitations are as follows:
●Maximum number of lists in device: 9999 ●Maximum number of songs in device: 65535 ●Maximum number of songs per list: 65535
CAUTION
■Caution while driving
Do not connect iPod or operate the controls.
NOTICE
■To prevent damage to iPod
●Do not leave the iPod in the vehicle. The temperature inside the vehicle may become high, resulting in damage to the iPod.
●Do not push down on or apply unnecessary pressure to the iPod while it is connected.
●Do not insert foreign objects into the port.


Other materials:
Connecting a Bluetooth® audio player
► Registering an additional device
Select “Select Device” on the Bluetooth® audio control screen.
►Selecting a registered device
Select “Select Device” on the Bluetooth® audio control screen.
■Reconnecting a Bluetooth® phone
If the system cannot connect due to poor ...
Abbreviations used in this manual
...
Circuit description
When a misfire occurs in the engine, hydrocarbons (hc) enter the exhaust in
high concentrations. If this hc
concentration is high enough, there could be an increase in exhaust emissions
levels. High concentrations
of hc passing through the catalyst also cause to temperature of the catalyst to ...