Toyota Corolla (E120) 2002–2008 Repair Manual / Exterior/interior trim / Front door belt moulding assy lh
Toyota Corolla (E120): Front door belt moulding assy lh
Replacement
Hint
:
- the installation procedures are the removal procedures in reverse order.
- Use the same procedures for the rh side and lh side.
1. Remove front armrest assy lh
2. Remove power window regulator master switch assy (w/ power window)
3. Remove front armrest base panel upper lh (w/o power window)
4. Remove front door window regulator handle assy (w/o power window)
5. Remove front door lower frame bracket garnish lh
6. Remove front door trim board sub–assy lh
7. Remove front door belt moulding assy lh
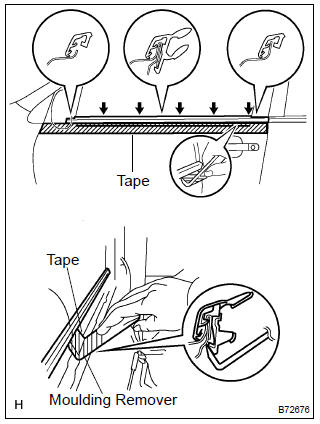
- Put protective tape under the weatherstrip.
- using a moulding remover, pry out the weatherstrip as shown in the illustration.
Hint
: tape the moulding remover tip before use.


Other materials:
On–vehicle inspection
1. Check basic function (manual operation function)
turn the ignition switch on.
Check that the door glass moves up when each window switch of the
regulator master switch
assembly is turned up and moves down when each window switch is turned down.
Check that the do ...
Inspection procedure
Hint:
if different dtcs related to different systems that have terminal e2
as the ground terminal are output
simultaneously, terminal e2 may be open.
Read freeze frame data using the hand-held tester or the obd ii scan
tool. Freeze frame data records
the engine conditions when a malf ...
Opening the trunk from outside the vehicle
◆ Smart key system (if equipped)
While carrying the electronic key, press the button on the trunk lid.
When all the doors are unlocked with the power door lock system, the trunk can
be opened without carrying the electronic key.
◆ Wireless remote control (if equipped)
► Veh ...