
Toyota Corolla (E120) 2002–2008 Repair Manual / Emission control / Engine assembly
Toyota Corolla (E120): Engine assembly
Inspection
1. Inspect coolant
2. Inspect engine oil
3. Inspect battery
4. Inspect air cleaner filter element sub–assy
5. Inspect spark plug
6. Inspect fan and generator v belt
Hint
: you don’t need to check the belt deflection because auto tensioner is adopted.
7. Inspect ignition timing
- Warm up engine.
- when using hand–held tester or obdii scan tool.
- Connect the hand–held tester or obdii scan tool to the dlc3.
Hint
: please refer to the hand–held tester or obdii scan tool operator’s manual for further details.
- when not using hand–held tester or obdii scan tool.
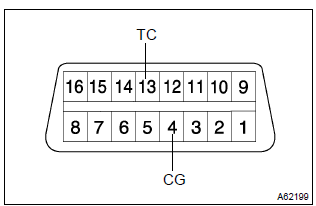
- Using sst, connect terminal 13 (tc) and 4 (cg) of
the dlc3.
Sst 09843–18040
Notice
:
- be sure not to connect incorrectly. It causes breakage of the engine.
- Turn off all electrical systems.
- Operate the inspection when the cooling fan motor is turned off
- remove the 2 nuts, 2 clips and cylinder head cover.
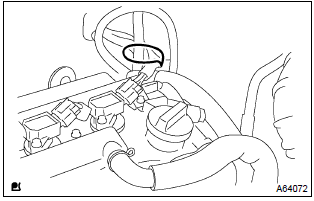
- Pull out the wire harness as shown in the illustration.
- Connect the clip of the timing light to the engine.
Notice
:
- use a timing light which can detect the first signal.
- After checking, be sure to tape the wire harness.
- Inspect ignition timing at idle.
Ignition timing: 8 – 12 btdc
N
otice
: when checking the ignition timing, the transmission is at neutral position.
Hint
: after engine rpm is kept at 1,000 – 1,300 rpm for 5 seconds, check that it returns idle speed.
- Disconnect the terminal 13 (tc) and 4 (cg) of the dlc3.
- Inspect ignition timing at idle.
Ignition timing: 10 – 18 btdc
- confirm that ignition timing moves to advanced angle side when the engine rpm is increased.
- Remove the timing light.
- Install cylinder head cover no.2 With the 2 nuts and
2 clips.
Torque: 7.0 Nvm (71 Kgf·cm, 62 in.Vlbf)
8. Inspect engine idle speed
- Warm up engine.
- when using hand–held tester or obdii scan tool.
- Connect the hand–held tester or obdii scan tool to the dlc3.
Hint
: please refer to the hand – held tester or obdii scan tool operator’s manual for further details.
- check the idle speed.
Idle speed: 650 – 750 rpm
Notice
:
- check idle speed with cooling fan off.
- Switch off all accessories and air conditioning.
9. Inspect compression
- Warm up and stop engine.
- remove ignition coil.
- remove spark plugs.
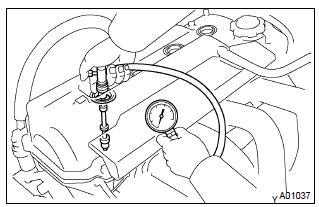
- inspect cylinder compression pressure.
Sst 09992–00500
- insert a compression gauge into the spark plug hole.
- Fully open the throttle.
- While cranking the engine, measure the compression
pressure.
Compression pressure
1,300 kpa (13.3 Kgf·cm2, 189 psi) minimum pressure: 1,000 kpa (10.2 Kgf·cm2, 145 psi) difference between each cylinder: 100 kpa (1.0 Kgf·cm2, 15 psi)
Notice
:
- always use a fully charged battery to obtain engine speed of 250 rpm or more.
- Check other cylinder’s compression pressure in the same way.
- This measurement must be done in as short a time as possible.
- If the cylinder compression in one more cylinders is low, pour a small amount of engine oil into the cylinder through the spark plug hole and repeat steps (1) through (3) for cylinders with low compression.
Hint
:
- if adding oil helps the compression, it is likely that the piston rings and/or cylinder bore are worn or damaged.
- If pressure stays low, a valve may be sticking or seating is improper, or there may be leakage past the gasket.
10. Inspect co/hc
- Start the engine.
- race engine at 2,500 rpm for approx. 180 Seconds.
- insert co/hc meter testing probe at least 40 cm (1.3 Ft) into tailpipe during idling.
- immediately check co/hc concentration at idle and/or 2,500 rpm.
Hint
:
- complete the measuring within 3 minutes.
- When doing the 2 mode (idle and 2,500 rpm) test, these measuring orders are prescribed by the applicable local regulations.
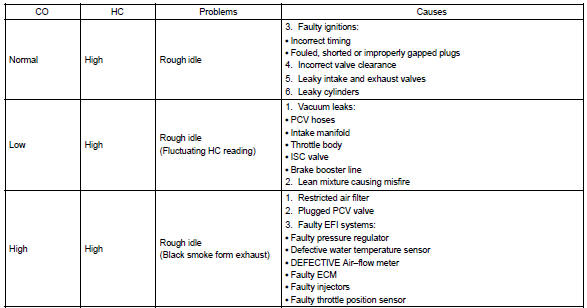
- if the co/hc concentration does not comply with regulations, troubleshoot in the order given below.
- Check heated oxygen sensor operation.
- see the table below for possible causes, and then inspect and correct the applicable causes if necessary.


Other materials:
Circuit description
The throttle pressure that is applied to the primary regulator
valve (which modulates the line pressure) causes the solenoid
valve slt, under electronic control, to precisely and minutely
modulate and generate the line pressure according the extent
of the accelerator pedal depressed or the o ...
Driving support system
information display
■ Driving support system
information
Select to display the operational
status of the following systems:
Dynamic radar cruise control
LTA (Lane Tracing Assist)
LDA (Lane Departure Alert)
■ Navigation system-linked
display (if equipped)
Select to display the following
navigation system-linked ...
Child restraint systems
Before installing a child
restraint system in the vehicle,
there are precautions
that need to be observed,
different types of child
restraint systems, as well as
installation methods, etc.,
written in this manual.
Use a child restraint system
when riding with a small child
that cannot properly use a ...