Toyota Corolla (E120) 2002–2008 Repair Manual / Engine control system / Ecm (1zz–fe)
Toyota Corolla (E120): Ecm (1zz–fe)
Replacement
1. Disconnect battery negative terminal
2. Remove glove compartment door assy
3. Remove ecm

- Remove the 2 clips using a clip remover. Then, open the cover.
- Disconnect the 4 ecm connectors.
- remove the wire harness from the wire harness clamp.
- Remove the 2 bolts.
- unfasten the claw and clip, then remove the ecm.
4. Remove ecm cover
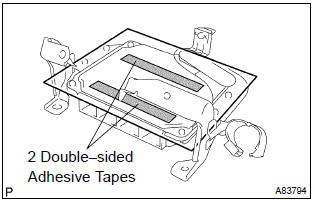
- Take the 2 double–sided adhesive tapes off the ecm, then remove the ecm cover.
5. Remove ecm bracket no.2 (Denso made)
- Remove the 2 screws, then remove the ecm bracket no.
2.
6. Remove ecm bracket no.1
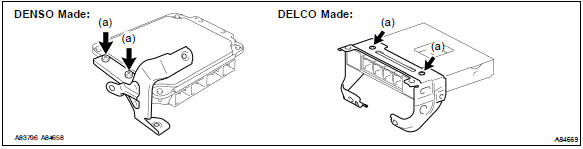
- Remove the 2 screws, then remove the ecm bracket no.
7. Remove ecm bracket no.3 (Delco made)
- Remove the 2 screws, then remove the ecm bracket no.
8. Install ecm bracket no.3 (Delco made) torque: 3.2 Nvm (33 kgfvcm, 28 in.Vlbf)
9. Install ecm bracket no.1 Torque: 3.2 Nvm (33 kgfvcm, 28 in.Vlbf)
10. Install ecm bracket no.2 (Denso made) torque: 3.2 Nvm (33 kgfvcm, 28 in.Vlbf)
11. Install ecm cover
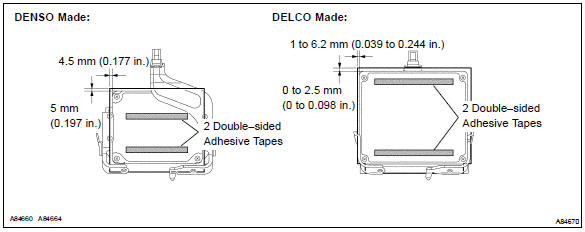
- Install a new ecm cover to the ecm as shown in the illustration.
12. Install ecm torque: 3.0 Nvm (31 kgfvcm, 27 in.Vlbf)
13. Install glove compartment door assy
14. Connect battery negative terminal torque: 5.4 Nvm (55 kgfvcm, 48 in.Vlbf)
15. Reset memory (a/t transaxle)
Caution
: perform the reset memory (at initialization) when replacing the ecm, engine assembly or automatic transaxle assembly.
- The hand–held tester only.
- Connect the hand–held tester to the dlc3.
- Turn the ignition switch on.
- Perform the reset memory procedure from the engine menu.
Caution
: after performing the reset memory, be sure to perform the road test as described earlier.


Other materials:
Fuel consumption information
Fuel consumption information
can be displayed on the
audio system screen.
System components
Audio system screen
Consumption
■ Trip information
1. Select on the main menu.
2. Select "Trip information".
If a screen other than "Current" is
displayed, select "Current".
The image is an example ...
Calibrating the compass
The direction display deviates from
the true direction determined by the earth’s magnetic field. The amount of deviation
varies according to the geographic position of the vehicle.
If you cross over a map boundary shown in illustration, the compass will deviate.
To obtain higher precision or ...
Tape is tangled due to incorrect tape speed or
auto–reverse malfunction
Inspection procedure
1 Check for any foreign object
Check for any foreign object.
Check that no foreign material and troubles are detected in the radio
receiver assembly cassette
tape player.
Standard: no foreign material and trouble detected.
2 Replace cassette tape with an ...