Toyota Corolla (E210) 2019-2024 Owners Manual / For safety and security / Child safety / Child restraint system
fixed with a child restraint
LATCH anchor (except for
Puerto Rico)
Toyota Corolla (E210): Child restraint system fixed with a child restraint LATCH anchor (except for Puerto Rico)
■ Child restraint LATCH anchors
LATCH anchors are provided for the outboard rear seat. (Marks displaying the location of the anchors are attached to the seats.)
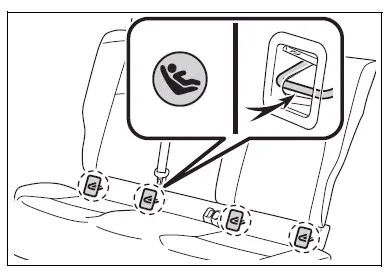
■ When installing in the rear outboard seats
Install the child restraint system in accordance to the operation manual enclosed with the child restraint system.
With flexible lower attachments
1. Remove the anchor covers, and install the child restraint system to the seat.
The bars are installed behind the anchor covers.
For owners in Canada: The symbol on a child restraint system indicates A the presence of a lower connector system.
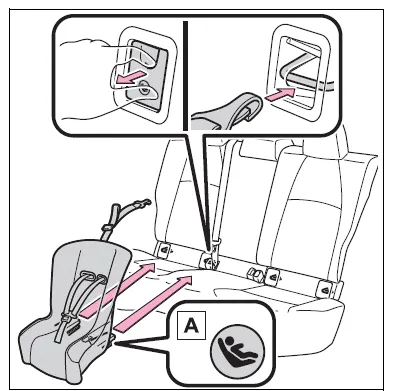
- Canada only
With rigid lower attachments
1. Remove the anchor covers, and install the child restraint system to the seat.
The bars are installed behind the anchor covers.
For owners in Canada: The symbol on a child restraint system indicates A the presence of a lower connector system.
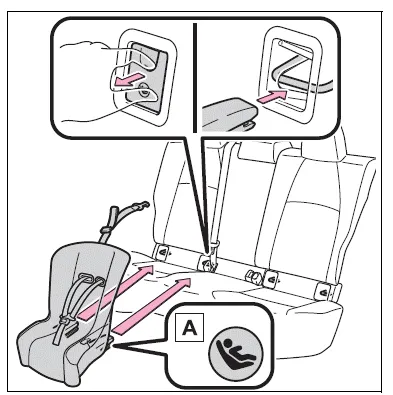
- Canada only
2. If the child restraint has a top tether strap, follow the child restraint manufacturer's operation manual regarding the installation, using the top tether strap to latch onto the top tether strap anchor.
3. After installing the child restraint system, rock it back and forth to ensure that it is installed securely.
■ When installing in the rear center seat
There are no LATCH anchors behind the rear center seat.
However, the inboard LATCH anchors of the outboard seats, which are 15.6 in. (396 mm) apart, can be used if the child restraint system manufacturer's instructions permit use of those anchors with the anchor spacing stated.
Child restraint systems with rigid lower attachments cannot be installed in the center seat. This type of child restraint system can only be installed in the outboard seat.
■Laws and regulations pertaining to anchors
The LATCH system conforms to FMVSS225 or CMVSS210.2.
Child restraint systems conforming to FMVSS213 or CMVSS213 specifications can be used.
This vehicle is designed to conform to SAE J1819.
WARNING
■When installing a child restraint system
Observe the following precautions.
Failure to do so may result in death or serious injury.
- When using the LATCH anchors, be sure that there are no foreign objects around the anchors and that the seat belt is not caught behind the child restraint system.
- Follow all installation instructions provided by the child restraint system manufacturer.
- Never attach two child restraint system attachments to the same anchor. In a collision, one anchor may not be strong enough to hold two child restraint system attachments and may break. If the LATCH anchors are already in use, use the seat belt to install a child restraint system in the center seat.
- When securing some types of
child restraint systems in rear
seats, it may not be possible to
properly use the seat belts in
positions next to the child
restraint without interfering with
it or affecting seat belt effectiveness.
Be sure your seat belt fits snugly across your shoulder and low on your hips. If it does not, or if it interferes with the child restraint, move to a different position. Failure to do so may result in death or serious injury.
- If the seat is adjusted, reconfirm the security of the child restraint system.


Other materials:
Inspection procedure
Hint:
read freeze frame data using the hand-held tester or the obd ii scan tool.
Freeze frame data records the
engine conditions when a malfunction is detected. When troubleshooting, it is
useful for determining whether
the vehicle was running or stopped, the engine was warmed up or not, the ...
Circuit description
Refer to dtc p0130
Dtc no.
Dtc detection condition
Trouble area
P0133
After engine has been warmed up, if response time that heated
oxygen sensor’s output voltage reaches from rich to lean.
Or from lean to rich, is 0.6 Second or more during idling.
...
Front axle lh hub bolt
Replacement
Hint: components:
1. Remove front wheel
2. Separate front disc brake caliper assy lh
3. Remove front disc
4. Remove front axle lh hub bolt
Using sst and a hammer handle or an equivalent, remove
the lh hub bolt.
Sst 09628–10011
5. Install front axle lh hub bolt
...