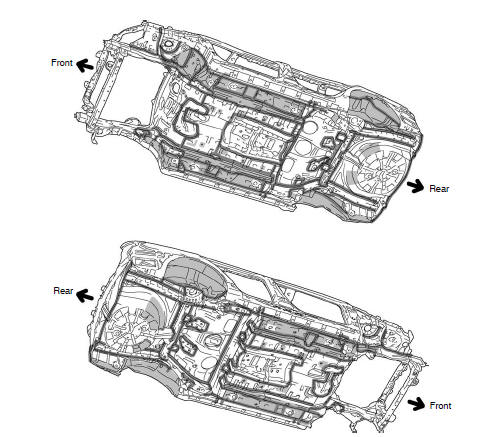
Toyota Corolla (E140) 2007–2013 Body Repair Manual / Paint coating / Body panel undercoating areas
Toyota Corolla (E140): Body panel undercoating areas
Apply pastar uwe or pastar uc to the chassis, floor underside, sheet metal fitting weld points of the body, and inside of the wheel house to prevent rust and noise, as well as protect the body from flying rocks.
Hint:
- work must be performed while wearing the appropriate protective gear and in a well-ventilated area.
- Apply degreasing agent to a clean cloth and clean any dirt and oil from the application areas.
- Cover the surrounding areas of the application areas with masking paper to avoid coating unnecessary areas.
- Do not coat high temperature areas, such as the tailpipe, or moving parts, such as the driveshaft.
- Do not leave any gaps between the panel joints.
- Apply sealer to the panel joints in advance.
Hint:
- parts coated using the pastar uwe should be left until dry to the touch in a 25 c environment for 60 to 75 minutes. Parts coated using pastar uc should be left until dry to the touch in a 25 c environment for 15 to 30 minutes.
- If using a pastar gun, one spray applies a 0.5 Mm thick coating.
- Pastar uwe: part number v9240-0025 pastar uc: spray type :part
number v9240-0008
aerosol type: part number v9240-0021
Reference
Tthe undercoating should be applied according to the specifications for your country while referring to the notes above.


Other materials:
Inspection
1. Power window system circuit
2. Inspect power window regulator master switch assy
Inspect the master switch continuity.
[Driver’s switch (window unlock and lock)]
Standard:
[Front passenger’s switch (window unlock)]
standard:
[Front passenger’s switch (window lock)]
...
Door control transmitter
Registration
1. Registration of recognition code
Hint:
the add mode is used to retain the already registered codes while
registering a new recognition code.
This mode is used when adding a transmitter. If the number of the registered
codes exceeds 4, the
previously registered code wi ...
If you think something is wrong
If you notice any of the following symptoms, your vehicle probably needs adjustment
or repair. Contact your Toyota dealer as soon as possible.
Visible symptoms
● Fluid leaks under the vehicle.
(Water dripping from the air conditioning after use is normal.)
● Flat-looking tires or u ...