
Toyota Corolla (E170) 2014–2019 Owners Manual / Instrument cluster / Warning lights and indicators / Warning lights
Toyota Corolla (E170): Warning lights
Warning lights inform the driver of malfunctions in the indicated vehicle’s systems.
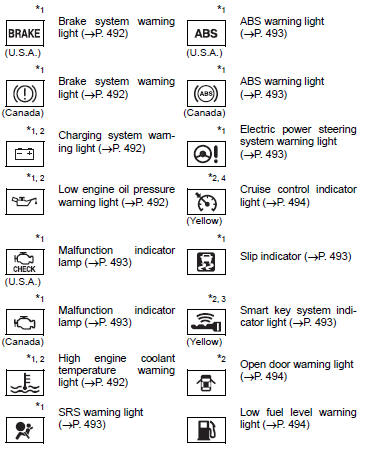
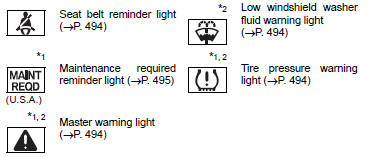
*1: Vehicles without a smart key system: These lights turn on when the engine switch is turned to the “ON” position to indicate that a system check is being performed. They will turn off after the engine is started, or after a few seconds. There may be a malfunction in a system if a light does not come on, or if the lights do not turn off. Have the vehicle inspected by your Toyota dealer.
Vehicles with a smart key system: These lights turn on when the engine switch is turned to IGNITION ON mode to indicate that a system check is being performed. They will turn off after the engine is started, or after a few seconds. There may be a malfunction in a system if a light does not come on, or if the lights do not turn off. Have the vehicle inspected by your Toyota dealer.
*2: If equipped
*3: The light flashes in yellow to indicate a malfunction. The light flashes quickly
in green to indicate that the steering lock has not been released.
*4: The light comes on in yellow to indicate a malfunction.


Other materials:
Drive shaft / propeller shaft
Preparation
Sst
Recomended tools
Equipment
Lubricant
...
Screen for general settings
1 Press the “SETUP” button.
2 Select “General” on the “Setup” screen.
1 “English”, “Français” or “Español” can be selected.
2 On/off can be selected to sound beeps.
3 Select to change the screen color.
4 Select to change the keyboard layout.
5 The animatio ...
Lubrication system
On–vehicle inspection
1. Check engine oil level
after warming up the engine and then 5 minutes after the engine
stops, oil level should be between
the ”l” and ”f” marks on the oil level gage.
If low, check for leakage and add oil up to the ”f” mark.
Notice:
do not ...