Toyota Corolla (E170) 2014–2019 Owners Manual / Interior features / Using the radio
Toyota Corolla (E170): Using the radio
Radio operation
Select “AM” or “FM” to begin listening to the radio.
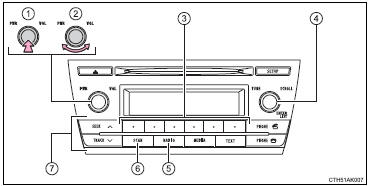
1 Power
2 Volume
3 Station selectors
4 Adjust frequency or select an item
5 AM/FM mode button
6 Scan for receivable stations
7 Seek a frequency
Setting station presets
1Search for a desired station by turning
 or pressing
 or
or
 .
.
2 Press and hold a desired station selector button until you hear a beep.
Scanning radio stations
■ Scanning preset radio stations 1
Press and hold  until you hear
a beep.
until you hear
a beep.
2 Preset stations will be played for 5 seconds each.
When the desired station is reached, press
 again.
■ Scanning all radio stations within range
1 Press  .
.
All stations with reception will be played for 5 seconds each.
2 When the desired station is reached, press
 again.
■When the battery is disconnected
Station presets are erased.
■Reception sensitivity
●Maintaining perfect radio reception at all times is difficult due to the continually changing position of the antenna, differences in signal strength and surrounding objects, such as trains, transmitters, etc.
●The radio antenna is mounted inside the rear window. To maintain clear radio reception, do not attach metallic window tinting or other metallic objects to the antenna wire mounted inside the rear window.
●When  is used, automatic station selection
may not be possible.
is used, automatic station selection
may not be possible.


Other materials:
Electronic control
Removal and installation of battery terminal
before performing electrical work, disconnect the
battery negative (–) terminal cable beforehand so
as to prevent burnt–out damage by short.
When disconnecting and installing the terminal
cable, turn the ignition switch an ...
Hood
Adjustment
Hint:
since the centering bolt is used as a hood hinge and hood lock
set bolt, the hood and hood lock can not be adjusted with it on.
Substitute a bolt with washer for the centering bolt.
1. Inspect hood sub–assy
Check that the clearance is within the standard value.
...
On–vehicle inspection
1. Check fuel pump operation
Connect the hand–held tester to the dlc3.
turn the ignition switch on and hand–held tester main
switch on.
Notice:
do not start the engine.
select the active test mode on the hand–held tester.
please refer to the hand–held te ...