Toyota Corolla (E120) 2002–2008 Repair Manual / Diagnostics / Audio system / Tape is tangled due to incorrect tape speed or
auto–reverse malfunction
Toyota Corolla (E120): Tape is tangled due to incorrect tape speed or auto–reverse malfunction
Inspection procedure
1 Check for any foreign object
- Check for any foreign object.
- Check that no foreign material and troubles are detected in the radio
receiver assembly cassette
tape player.
Standard: no foreign material and trouble detected.


2 Replace cassette tape with another and recheck(below 90 min.)
- Replace the cassette tape with another and recheck.
- Replace the faulty cassette tape with the normal one (90 min. Or
less) to see if the same trouble
occurs again.
Standard: malfunction disappear.


3 Clean head and check operation
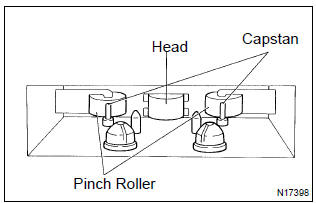
- Head cleaning
- raise the cassette door with your finger. Next, using a pencil or similar object, push in the guide.
- Using a cleaning pen or cotton applicator soaked in cleaner, clean the head surface, pinch rollers and capstans.
- Check that the same trouble occurs again.


Check and replace radio receiver assy


Other materials:
Inspection procedure
1 Check connector
Disconnect the negative (–) terminal cable from the battery, and wait at
least for 90 seconds.
check the connection of the combination meter connector and the
airbag sensor assy center connectors.
Ok:
the connectors are connected.
2 Check combination ...
Circuit description
Refer to dtc p0010
Dtc no.
Dtc detection condition
Trouble area
P0011
Condition (a) or (b) continues after engine is warmed up and
engine speed at 550 to 4,000 rpm (problem of the advanced
ocv):
valve timing does not change from current valve tim ...
Side mudguard sub–assy lh
Replacement
Hint:
use the same procedures for the rh side and lh side.
1. Remove side mudguard sub–assy lh
Using a clip remover, remove the 8 retainers and 9 clips.
using a moulding remover, remove the mudguard.
2. Install side mudguard sub–assy lh
Install the mudgu ...