Toyota Corolla (E170): Starting the engine
1 Continuously variable transmission: Ensure that the shift lever is in P and depress the brake pedal.
Manual transmission: Shift the shift lever to N and depress the clutch pedal.
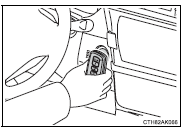
2 Touch the Toyota emblem side of the electronic key to the engine switch.
When the electronic key is detected, a buzzer sounds and the engine switch will turn to IGNITION ON mode.
When the smart key system is deactivated in customization setting, the engine switch will turn to ACCESSORY mode.
3 Vehicles without a multi-information display: Firmly depress the brake pedal (continuously variable transmission) or clutch pedal (manual transmission) and check that the smart key system indicator light (green) turns on.
Vehicles with a multi-information display: Firmly depress the brake pedal (continuously
variable transmission) or clutch pedal (manual transmission) and check that
 is shown on the multi-information display.
4 Press the engine switch.
In the event that the engine still cannot be started, contact your Toyota dealer.
■Stopping the engine
Shift the shift lever to P (continuously variable transmission) or N (manual transmission) and press the engine switch as you normally do when stopping the engine.
■Replacing the key battery
As the above procedure is a temporary measure, it is recommended that the electronic key battery be replaced immediately when the battery is depleted.
■Changing engine switch modes
Release the brake pedal (continuously variable transmission) or clutch pedal (manual transmission) and press the engine switch in step 3 above.
The engine does not start and modes will be changed each time the switch is pressed. ■When the electronic key does not work properly
●Make sure that the smart key system has not been deactivated in the customization setting. If it is off, turn the function on.
●Check if battery-saving mode is set. If it is set, cancel the function.


Other materials:
Warning light and warning buzzer list
*1: Parking brake engaged warning buzzer:
*2: Open door warning buzzer:
*3: Vehicles with a drive monitor display
*4: Vehicles with a multi-information display
*5: Driver’s seat belt buzzer:
Vehicles without a smart key system: The driver’s seat belt buzzer sounds to alert
the d ...
Overhaul
1. Drain brake fluid
Notice:
wash the brake fluid off immediately if it comes into contact with any painted
surface.
2. Remove air cleaner cap sub–assy
3. Remove brake master cylinder sub–assy
disconnect the brake fluid level switch connector from
master cylinder reservoir subâ ...
Valve clearance
Adjustment
1. Remove cylinder head cover no.2
Remove the 2 nuts, 2 clips and cylinder head cover.
2. Disconnect engine wire
Remove the 5 clamps from the 5 clamp brackets.
Disconnect the 4 ignition coil connectors.
Remove the bolt and nut installing the engine wire ...