Toyota Corolla (E120) 2002–2008 Repair Manual / Automatic transmission / trans / Shift lock system (atm)
Toyota Corolla (E120): Shift lock system (atm)
On–vehicle inspection
1. Check shift lock operation
- shift the shift lever to p position.
- turn the ignition switch to lock.
- check that the shift lever cannot be shifted to any other positions other than p.
- turn the ignition switch to on, depress the brake pedal and check that the shift lever can be shifted to any other positions.
2. Check shift lock release button operation
- using a screwdriver, remove the shift lock release button cover.
- when operating the shift lever with the shift lock release button pressed and the ignition key in acc or on, check that the lever can be shifted to any other positions.
3. Check key interlock operation
- turn the ignition switch to on.
- depress the brake pedal and shift the shift lever to any other positions other than p.
- check that the ignition key cannot be turned to lock.
- shift the shift lever to p position, turn the ignition key to lock and check that the ignition key can be removed.
4. Inspect shift lock control ecu
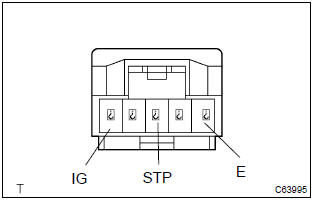
- Using a voltmeter, measure the voltage at each terminal.
Hint
: do not disconnect the shift lock control ecu connector.

- Using an ohmmeter, measure the resistance at terminal e (1) and body ground.


Other materials:
Noise occurs
Inspection procedure
1 Check of speaker installation
Check speaker installation condition.
Check that each speaker is securely installed.
Standard: malfunction disappear.
Hint:
the radio is equipped with noise prevention system that does not work against
the regular use of t ...
Maintenance requirements
To ensure safe and economical
driving, day-to-day care
and regular maintenance
are essential. It is the
owner's responsibility to
perform regular checks.
Toyota recommends the
maintenance below.
■Repair and replacement
It is recommended that genuine
Toyota parts be used for repairs to
ensure perf ...
Maintenance data (fuel, oil level,
etc.)
Dimensions and weight
*1:Unladen vehicles
*2:Vehicles without 18-inch tires
*3:Vehicles with 18-inch tires for Guam and Saipan
*4:Vehicles with 18-inch tires except for Guam and Saipan
*5:For Guam and Saipan
Seating capacity
Vehicle identification
■ Vehicle identification number
The vehicle iden ...