Toyota Corolla (E120) 2002–2008 Repair Manual / Exterior/interior trim / Roof drip side finish moulding center lh
Toyota Corolla (E120): Roof drip side finish moulding center lh
Replacement
Hint
:
- use the same procedures for the rh side and lh side.
- The installation procedures are the removal procedures in reverse order. However, only installation procedures requiring additional information are included.
1. Remove roof drip side finish moulding center lh
- Apply protective tape onto the circumference of the moulding for protection.
- using a remover for the roof moulding, release the engagements of the clips both in the front and rear ends of the moulding. Then remove the moulding.
Notice
:
- do not remove the clips.
- If clips are damaged during removal or removed accidentally, replace them.
2. Install roof drip side finish moulding clip no.1
Notice
: step 2 should be performed only when replacing the clips.
- remove the double–sided tape that remains on the mounting surface of the body, and then clean the surface with white gasoline.
- using a heat light, heat the clip installation surfaces of the body.
Heating temperature:

Notice
: do not heat the body and moulding excessively.
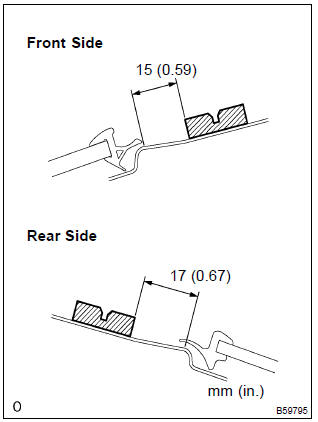
- set new clips in the positions as shown in the illustration,
and press–fit those clips by hand to install them.
Hint
: clips for the roof drip side finish moulding are supply parts.
- after press–fitting the clips, wait at last 30 minutes. Then install the moulding.
Hint
:
- initial hardening time: 30 minutes
- prefect hardening time: 24 hours


Other materials:
Steering wheel audio switches
Some audio features can be controlled using the switches on the steering wheel.
Operation may differ depending on the type of multimedia system or navigation
system. For details, refer to the manual provided with the multimedia system or
navigation system.
Operating the multimedia system using ...
Setting speed dials
1 Select “Add SD” using . 2 Select
the desired data using .
3 Press and hold the desired preset button (from
to
).
For details about setting speed dials from the call history: For details about
deleting speed dials: ...
Diagnostic trouble code chart
Terms
Terms
Physical address
Three–digit code (shown in hexadecimal) which is given to each
component comprising
the avc–lan.
Corresponding to the function, individual symbols are specified.
Logical address
Two–digit code (shown in hexadeci ...