Toyota Corolla (E170) 2014–2019 Owners Manual / When trouble arises / Steps to take in an emergency / If you have a flat tire / Replacing a flat tire
Toyota Corolla (E170): Replacing a flat tire
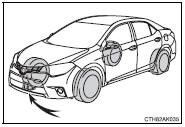
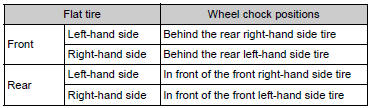
1 Chock the tires.
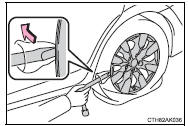
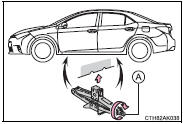
2 For vehicles with steel wheels, remove the wheel ornament using the wrench.
To protect the wheel ornament, place a rag between the wrench and the wheel ornament, as shown in the illustration.
3 Slightly loosen the wheel nuts (one turn).
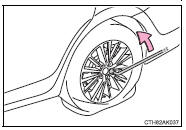
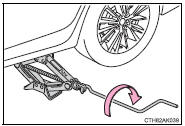
4 Turn the tire jack portion “A” by hand until the notch of the jack is in contact with the jack point.
The jack point guides are located under the rocker panel. They indicate the jack point positions.
5 Raise the vehicle until the tire is slightly raised off the ground.
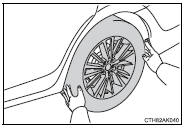
6 Remove all the wheel nuts and the tire.
When resting the tire on the ground, place the tire so that the wheel design faces up to avoid scratching the wheel surface.
CAUTION
■Replacing a flat tire
●Do not touch the disc wheels or the area around the brakes immediately after the vehicle has been driven.
After the vehicle has been driven the disc wheels and the area around the brakes will be extremely hot. Touching these areas with hands, feet or other body parts while changing a tire, etc. may result in burns.
●Failure to follow these precautions could cause the wheel nuts to loosen and the tire to fall off, resulting in death or serious injury.
• Have the wheel nuts tightened with a torque wrench to 76 ft•lbf (103 N•m, 10.5 kgf•m) as soon as possible after changing wheels.
• Do not attach a heavily damaged wheel ornament, as it may fly off the wheel while the vehicle is moving.
• When installing a tire, only use wheel nuts that have been specifically designed for that wheel.
• If there are any cracks or deformations in the bolt screws, nut threads or bolt holes of the wheel, have the vehicle inspected by your Toyota dealer.
• When installing the wheel nuts, be sure to install them with the tapered ends facing inward.


Other materials:
Gauges and meters (multi-information display)
The displayed content may differ depending on the type of meter.
1 Tachometer
Displays the engine speed in revolutions per minute.
2 Speedometer
3 Fuel gauge
4 Multi-information display
The multi-information display presents the driver with a variety of drivingrelated
data including the cu ...
Body dimension drawings
Engine compartment
Body opening areas (side view: front)
Body opening areas (side view: rear)
Sedan
Body opening areas (rear view)
Sedan
Under body
Under body
Front suspension crossmember
Front suspension crossmember
...
If your vehicle needs to be towed
If towing is necessary, we
recommend having your
vehicle towed by your Toyota
dealer or commercial
towing service, using a
wheel-lift type truck or flatbed
truck.
Use a safety chain system
for all towing, and abide by
all state/provincial and local
laws.
WARNING
Observe the following precautions.
...