Toyota Corolla (E120): Replacement
Hint
: installation is in the reverse order of the removal. But the installation is indicated only when it has a point.
1. Remove luggage compartment door cover
2. Remove rear spoiler
- remove the 2 screws.
- disconnect the wire harness connector.
- put protective tape.
- using a heat light, heat the spoiler to 40 – 60 c (104 – 140 f).
- tie both piano wire ends to a wooden block or a similar object.
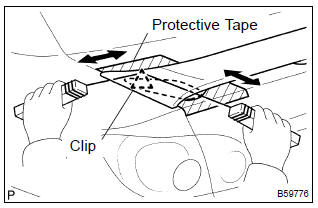
- Scrape the spoiler protector off by pulling the piano wire as shown in the illustration.
Notice
:
- if reusing the rear spoiler, take care not to damage the rear spoiler.
- Do not damage the body and wire harness.
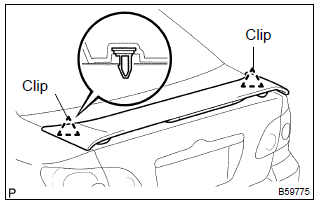
- Remove the 2 clips, wire harness grommet and rear spoiler.
3. Remove center stop lamp assy
- remove the 2 bolts and the center stop lamp assembly.
4. Install rear spoiler
- using a heat light, heat the body mounting surface to 40
– 60 c (104 – 140 f).
Notice: do not heat the body excessively.
- remove the protective tape from the body.
- wipe off the stains with cleaner.
- clean the rear spoiler (if reusing the rear spoiler).
- Using a heat light, heat the rear spoiler to 40 – 60 c
(104 – 140 f).
Notice
: do not heat the rear spoiler excessively.
- Remove the rear spoiler protector from the rear spoiler.
- Wipe off the stains with cleaner.
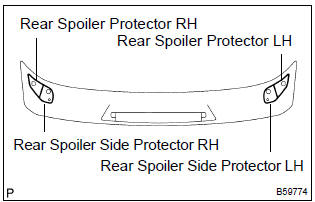
- Install 4 new rear spoiler protectors to the rear spoiler as shown in the illustration.


Other materials:
Inspection procedure
Hand–held tester:
1 Check fuel tank cap assy(check that fuel tank cap is toyota
genuine parts)
2 Check that fuel tank cap is correctly installed
3 Inspect fuel tank cap assy
4 Check filler neck for damage
Remove the fuel tank cap.
visually check the fuel inlet pipe for ...
RCTA function
■ Operation of the RCTA function
The RCTA function uses rear side radar sensors to detect vehicles
approaching from the right or left at the rear of the vehicle and alerts
the driver of the presence of such vehicles by flashing the outside
rear view mirror indicators and sounding a buzzer.
Appr ...
Adding the washer fluid
Add washer fluid in the following
situations:
A washer does not work.
The warning message
appears on the multi-information
display.
WARNING
■When adding washer fluid
Do not add washer fluid when the
engine is hot or running as
washer fluid contains alcohol and
may catch fire if spilled on t ...