Toyota Corolla (E120): Replacement
1. Drain brake fluid
Notice
: wash the brake fluid off immediately if it comes into contact with any painted surface.
2. Remove front wheel rh
3. Remove front fender liner rh
4. Remove brake actuator with bracket
- turn the latch of the actuator connector to disconnect the connector.
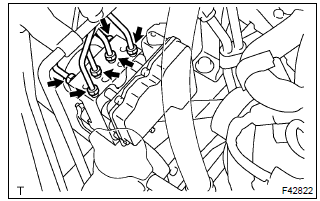
- Using sst, disconnect the 6 brake tubes from the brake
actuator.
Sst 09023–00100
- Attach tags or make a memo to identify the place to reconnect.
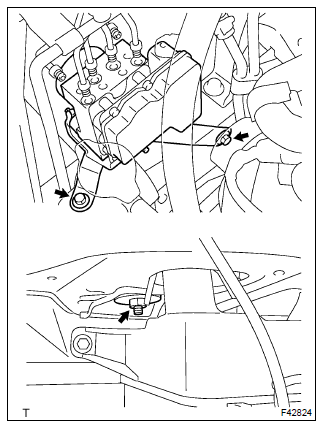
- Remove the nut, 2 bolts and brake actuator with bracket.
5. Remove brake actuator assy
- remove the 3 nuts and brake actuator from bracket.
6. Install brake actuator assy
- install the brake actuator with the 3 nuts to the bracket.
Torque: 4.7 Nvm (48 Kgf·cm, 42 in.Vlbf)
7. Install brake actuator with bracket

- Install the brake actuator with bracket with the nut and 2
bolts.
Torque: 19 nvm (194 Kgf·cm, 14 ft·lbf)
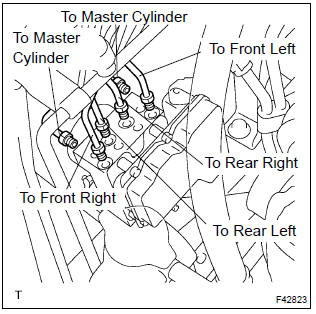
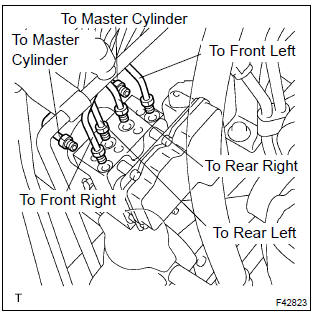
- Using sst, connect the 6 brake tubes to the correct position
of brake actuator, as shown in the illustration.
Sst 09023–00100
torque: 15.2 Nvm (155 Kgf·cm, 11 ft·lbf) - connect the brake actuator connector.
8. Install front fender liner rh
9. Install front wheel rh
torque: 103 nvm (1,050 Kgf·cm, 76 ft·lbf)
10. Fill reservoir with brake fluid
11. Bleed master cylinder
sst 09023–00100
12. Bleed brake line
13. Check fluid level in reservoir
14. Check brake fluid leakage
15. Check brake actuator with hand–held tester


Other materials:
RSA (Road Sign Assist)
The RSA system detects
specific road signs using
the front camera and/or navigation
system (when speed
limit information is available)
and warns the driver
via displays and buzzers.
WARNING
■For safe use
Driving safely is solely the
responsibility of the driver. Pay
careful attention to the su ...
If your vehicle has to be stopped
in an emergency
Only in an emergency, such
as if it becomes impossible
to stop the vehicle in the
normal way, stop the vehicle
using the following procedure:
Stopping the vehicle
1. Steadily step on the brake
pedal with both feet and
firmly depress it.
Do not pump the brake pedal
repeatedly as this will increase t ...
Adjustment
Hint:
in the rh side, work in the same procedure as in the lh side.
Since the centering bolt is used as a door side hinge bolt,
the door hinge cannot be adjusted with it on. Substitute
the bolt with washer for the centering bolt.
1. Inspect rear door panel sub–assy lh
Check ...