Toyota Corolla (E120): Replacement
1. Drain engine oil
- remove the oil pan drain plug and drain the engine oil.
2. Removal & installation chain sub–assy
3. Remove chain vibration damper no.1
- remove 2 bolts and chain vibration damper no. 1.
4. Remove oil pump assy
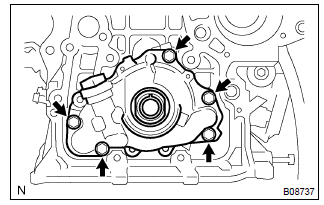
- Remove the 5 bolts.
- remove the oil pump assy and gasket.
5. Install oil pump assy
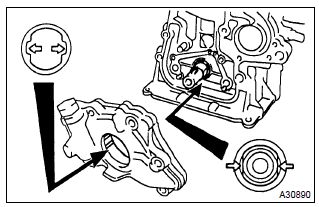
- Place a new gasket on the cylinder block.
- engage the spline teeth of the oil pump drive rotor with the large teeth of the crankshaft, and side the oil pump.
- install the oil pump with the 5 bolts.
Torque: 9.0 Nvm (92 Kgf·cm, 80 in.Vlbf)
6. Install chain vibration damper no.
1
- install the chain vibration damper no. 1 With 2 bolts.
Torque: 9.0 Nvm (92 Kgf·cm, 8.0 In.Vlbf)
7. Install oil pan drain plug
- clean and install the oil pan drain plug with a new gasket.
Torque: 37 nvm (377 Kgf·cm, 27 ft·lbf)
8. Add engine oil
Capacity:
drain and refill w/ oil filter change 3.7 Liters (3.9 Us qts, 3.3 Lmp. Qts)
drain and refill w/o oil filter change 3.5 Liters (3.7 Us qts, 3.1 Lmp. Qts)
dry fill 4.2 Liters (4.4 Us qts, 3.7 Lmp. Qts)
9. Add coolant(seepage 16–7)
10. Inspect oil leak
11. Inspect check engine coolant leak


Other materials:
Lower ball joint assy front lh
Replacement
Hint: components:
1. Inspect lower ball joint assy front lh
Jack up front side of the vehicle.
check the rattle of the lower ball joint assy front lh.
2. Remove front wheel
3. Remove front axle hub lh nut
sst 09930–00010
4. Disconnect speed sensor front lh (w/ ...
Changing engine switch modes
Modes can be changed by pressing the engine switch with the brake pedal (continuously
variable transmission) or clutch pedal (manual transmission) released. (The mode
changes each time the switch is pressed.)
► Vehicles without a multi-information display
Off*
The emergency flashers ca ...
Diagnostic trouble code chart
Terms
Terms
Physical address
Three–digit code (shown in hexadecimal) which is given to each
component comprising
the avc–lan.
Corresponding to the function, individual symbols are specified.
Logical address
Two–digit code (shown in hexadeci ...