Toyota Corolla (E120): Overhaul
1. Remove bench type rear seat cushion assy
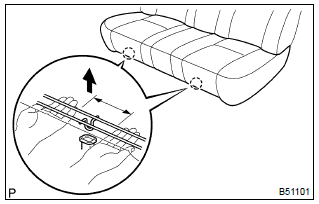
- Disengage the 2 clamps, and then remove the seat cushion.
2. Remove bench type rear seat back assy
- remove the headrests.
- remove the 2 bolts and seat back.
3. Remove bench type rear seat cushion cover
- remove the hog rings and seat cushion cover.
4. Remove bench type rear seat back cover
- remove the headrest supports.
- remove the hog rings and seat back cover.
5. Install bench type rear seat back cover
- cover the top of the seat back pad with the seat back cover.
- install the headrest supports.
- using hog ring pliers, fully install the seat back cover with new hog rings.
Notice
:
- be careful not to damage the cover.
- Be careful to prevent the cover wrinkles as little as possible.
6. Install bench type rear seat cushion cover
- using hog ring pliers, install the seat cushion cover with new hog rings.
Notice
:
- be careful not to damage the cover.
- Be careful to prevent the cover wrinkles as little as possible.
7. Install bench type rear seat back assy
- hook the seat back to the body.
- install the 2 bolts.
Torque: 7.8 Nvm (80 kgfvcm, 69 in.Vlbf)
8. Install bench type rear seat cushion assy
- insert the seat cushion under the seat back.
- engage the 2 clamps.


Other materials:
Shifting the shift lever to R
Shift the shift lever to R while lifting up the ring section.
■Maximum allowable speeds
Observe the following maximum allowable speeds in each gear when maximum acceleration
is necessary.
mph (km/h)
NOTICE
■To prevent damage to the transmission
●Do not lift up the ring ...
Inspection
1. Inspect sliding roof limit switch
Inspect the sliding roof limit switch continuity.
Standard:
If the continuity is not as specified, replace the switch.
2. Inspect sliding roof drive gear sub–assy
Connect the positive (+) lead from the battery to terminal
2 and the ne ...
Using the steering wheel switches
The steering wheel switches can be used to operate a connected cellular phone
or portable digital audio player (portable player).
Operating a Bluetooth® phone using the steering wheel switches
1 Volume
The voice guidance volume cannot be adjusted using these buttons.
2 Off-hook switch
Turns ...