Toyota Corolla (E120): Overhaul
1. Drain clutch fluid
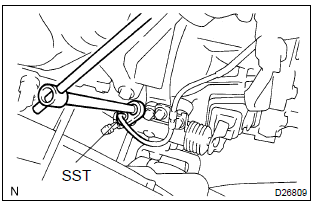
2. Disconnect clutch release cylinder to flexible hose tube
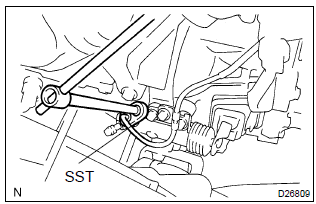
- Using sst, disconnect the flexible hose tube.
Sst 09023–00100
Hint
: use a container to catch the fluid.
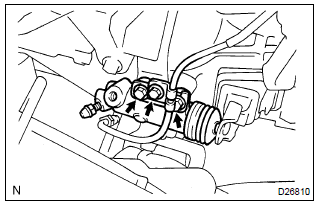
3. Remove clutch release cylinder assy
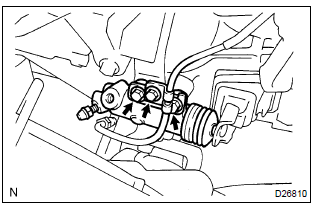
- Remove the 3 bolts, clutch release cylinder assy and clutch line bracket.
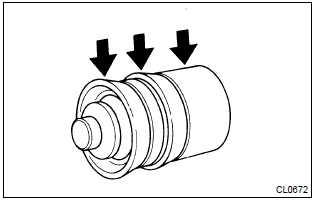
4. Remove clutch release cylinder kit
- remove the boot from the cylinder body.
- remove the push rod from the cylinder body.
- remove the piston from the cylinder body.
Notice
: be careful not to damage the inside of the cylinder body.
- remove the spring from the cylinder body.
- remove the bleeder plug cap from the bleeder plug.
5. Remove release cylinder bleeder plug
6. Install release cylinder bleeder plug
torque: 8.4 Nvm (85 Kgf·cm, 74 in.Vlbf)
7. Install clutch release cylinder kit
- Install the bleeder plug cap to the bleeder plug.
- install a new spring to the cylinder body.
- coat parts with lithium soap base glycol grease, as shown in the illustration.
- install the piston to the cylinder body.
Notice
: be careful not to damage the inside of the cylinder body.
- install the push rod to the cylinder body.
- install the boot to the cylinder body.
8. Install clutch release cylinder assy
- Install the clutch release cylinder and clutch line bracket
with the 2 bolts.
Torque: 11.8 Nvm (120 Kgf·cm, 9 ft·lbf)
- install the flexible hose tube with the bolt.
Torque: 5.0 Nvm (51 Kgf·cm, 44 in.Vlbf)
9. Connect clutch release cylinder to flexible hose tube
- Using sst, connect the flexible hose tube.
Sst 09023–00100
torque: 15.2 Nvm (155 Kgf·cm, 11 ft·lbf)
10. Bleed clutch pipe line
- fill the brake reservoir tank with brake fluid and bleed clutch
system.
Torque: 8.4 Nvm (85 Kgf·cm, 74 in.Vlbf)
11. Check clutch fluid leakage


Other materials:
Air outlets
■ Location of air outlets
The air outlets and air volume changes according to the selected airflow mode.
: Some models
■ Adjusting the position of and opening and closing the air outlets
► Front center outlets
Direct air flow to the left or right, up or down.
► Fro ...
PDA (Proactive driving assist)
When a detectable object
is detected, the
proactive driving assist
operates the brakes and
steering wheel to help prevent
the vehicle from
approaching too close to
the object.
WARNING
■For safe use
Driving safely is solely the responsibility
of the driver.
The proactive driving assist is
design ...
Fuel information
You must only use unleaded
gasoline.
Select octane rating of 87
(Research Octane Number
91) or higher. Use of
unleaded gasoline with an
octane rating lower than 87
may result in engine knocking.
Persistent knocking
can lead to engine damage.
At minimum, the gasoline you
use should meet the specifi ...