
Toyota Corolla (E120): Overhaul
1. Drain clutch fluid
2. Remove brake master cylinder sub–assy
3. Remove brake booster assy
4. Disconnect clutch reservoir tube
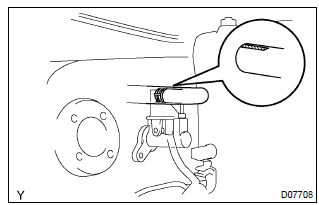
- Loosen the clip and disconnect the clutch reservoir tube from the clutch master cylinder assy.
Hint
: use a container to catch the fluid.
5. Disconnect clutch master cylinder to flexible hose tube
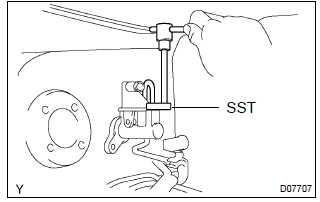
- Using sst, disconnect the flexible hose tube.
Sst 09023–00100
Hint
: use a container to catch the fluid.
6. Remove clutch pedal spring
7. Remove clutch master cylinder push rod clevis w/hole pin
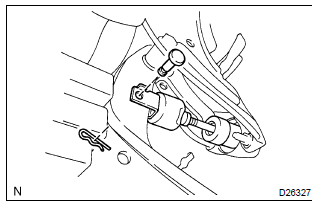
- Remove the clip and hole pin.
8. Remove clutch master cylinder assy
- remove the 2 nuts and clutch master cylinder assy.
9. Remove clutch master cylinder kit
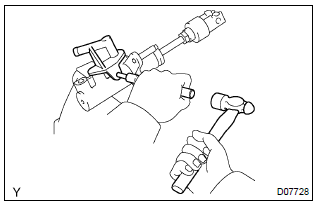
- Using a pin punch and a hammer, drive out the slotted spring pin.
- remove the inlet union and grommet.
- loosen the lock nut, and remove the clevis.
- remove the lock nut from the push rod.
- remove the boot from the cylinder body.
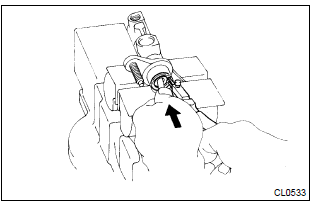
- While pushing the push rod, using snap ring pliers, remove the snap ring.
- remove the push rod from the cylinder body.
Notice
: the piston may pop up out of the cylinder body. Therefore, slowly remove the push rod from the cylinder body.
- remove the stop plate from the push rod.
- remove the piston with spring from the cylinder.
Notice
: be careful not to damage the inside of the cylinder body.
10. Install clutch master cylinder kit
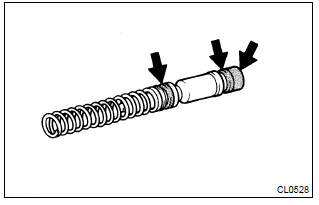
- Coat parts with lithium soap base glycol grease, as shown in the illustration.
- install the piston with spring into the cylinder.
Notice
: be careful not to damage the inside of the cylinder body.
- install the stop plate to the push rod.
- install the push rod to the cylinder body.
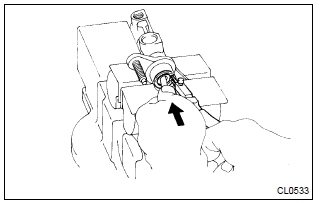
- While pushing the push rod, using snap ring pliers, install the snap ring.
- install the boot to the cylinder body.
- install the lock nut to the push rod.
- temporarily install the clevis with the lock nut to the push rod.
- install the inlet union and a new grommet.
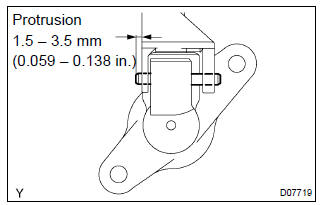
- Using a pin punch and a hammer, drive in the slotted spring pin.
11. Install clutch master cylinder assy
- install the clutch master cylinder assy with the 2 nuts.
Torque: 11.8 Nvm (120 Kgf·cm, 9 ft·lbf)
12. Install clutch master cylinder push rod clevis w/hole pin
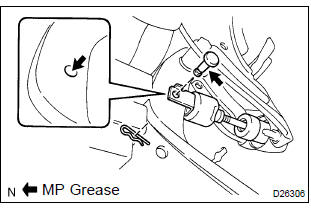
- Apply mp grease to the contact surface of the hole pin and clevis bush.
- connect the clevis to the clutch pedal sub–assy with the
hole pin.
Hint
: install the hole pin from the right side of the vehicle.
- install the clip to the hole pin.
13. Install clutch pedal spring
14. Connect clutch master cylinder to flexible hose tube
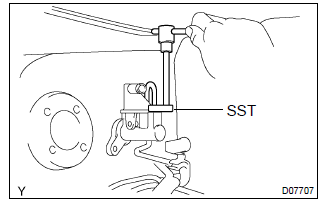
- Using sst, connect the flexible hose tube.
Sst 09023–00100 torque: 15.2 Nvm (155 Kgf·cm, 11 ft·lbf)
15. Connect clutch reservoir tube
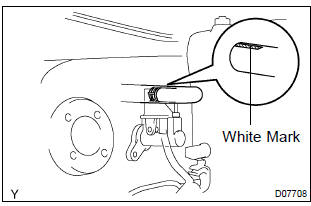
- Connect the clutch reservoir tube with the clip to the clutch master cylinder assy.
Notice
: facing the white mark upward.
16. Install brake booster assy
17. Install brake master cylinder sub–assy
18. Bleed brake line
19. Bleed clutch pipe line
- fill the brake reservoir tank with clutch fluid and bleed clutch
system.
Torque: 8.4 Nvm (85 Kgf·cm, 73 in.Vlbf)
20. Check and adjust brake pedal height
21. Inspect and adjust clutch pedal sub–assy
22. Check brake fluid leakage
23. Check clutch fluid leakage
24. Check fluid level in reservoir


Other materials:
Inspection procedure
1 Inspect dlc3 terminal voltage
Turn the ignition switch to on.
measure voltage between terminals 13 (tc) and 4 (cg) of
dlc3.
Ok:
voltage: 10 – 16 v
2 Check harness and connector(between cruise control ecu assy
and dlc3)
Check for open and short circuit in harness ...
Circuit description
Shifting from 1st to o/d is performed in combination with on and off of the
shift solenoid valve s1 and s2
controlled by ecm. If an open or short circuit occurs in either of the solenoid
valves, the ecm controls the
remaining normal solenoid valve to allow the vehicle to be operated smoothly
...
Circuit description
The rear heated oxygen sensor is used to monitor oxygen concentration in the
exhaust gas. For optimum
catalytic converter operation, the air fuel mixture must be maintained near the
ideal ”stoichiometric” ratio.
The heated oxygen sensor output voltage changes suddenly in the vicinity of ...