Toyota Corolla (E120) 2002–2008 Repair Manual / Heater & air conditioner / Refrigerant / On–vehicle inspection
Toyota Corolla (E120): On–vehicle inspection
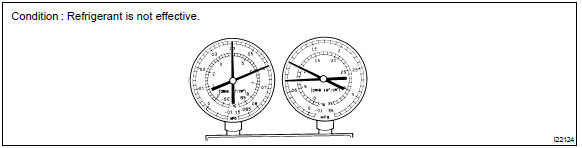
1. Inspect refrigerant pressure with manifold gauge set
- this is a method in witch the trouble is located by using
a manifold gauge set. Read the manifold gauge pressure
when the these conditions are established.
Test conditions:
- temperature at the air inlet with the switch set at recirc is 30 – 35 °c (86 – 95 °f)
- engine running at 1500 rpm
- blower speed control switch at ”hi” position
- temperature control dial at ”cool” position a/c switch on
- fully open doors
- Normally functioning refrigeration system.
Gauge reading:
low pressure side:
0.15 – 0.25 Mpa (1.5 – 2.5 Kgf/cm2) high pressure side:
1.37 – 1.57 Mpa (14 – 16 kgf/cm2)
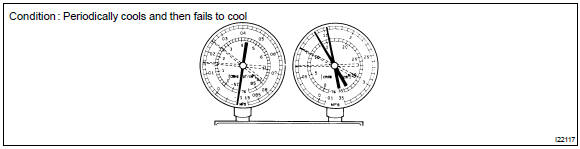
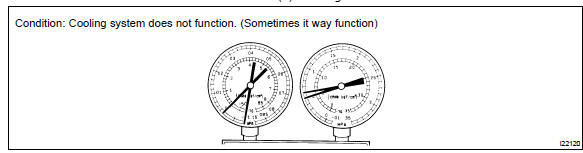
- Moisture present in refrigeration system.
|
Symptom |
Probable cause |
Diagnosis |
Remedy |
| During operation, pressure on low pressure side sometimes become a vacuum and sometime normal | Moisture in refrigerating system freezes at expansion valve orifice causing a temporary stop of cycle, however, when it melts, normal state is restored. |
|
|
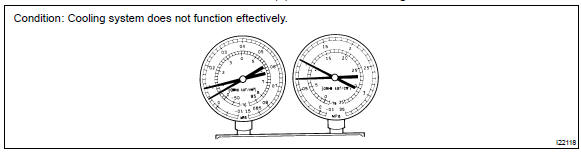
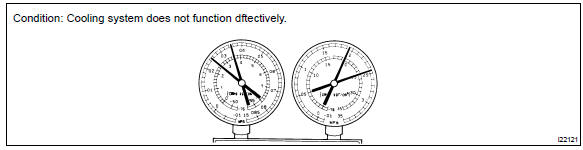
- Insufficient cooling
|
Symptom |
Probable cause |
Diagnosis |
Corrective actions |
|
Gas leakage in refrigeration system |
|
|
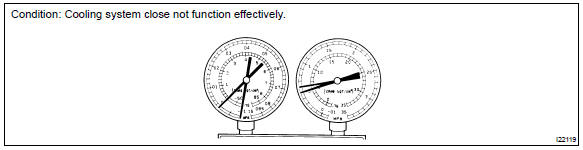
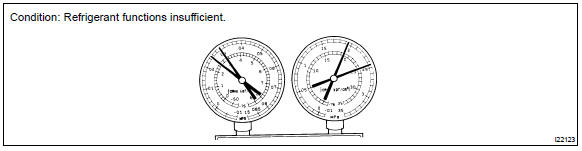
- Poor circulation of refrigerant
|
Symptom |
Probable cause |
Diagnosis |
Corrective actions |
|
Refrigerant flow obstructed by dirt in receiver | Receiver clogged | Replace condenser |
- Refrigerant does not circulate
|
Symptom |
Probable cause |
Diagnosis |
Corrective actions |
|
|
Refrigerant does not circulate |
|
- Refrigerant overcharged or insufficient cooling of condenser
|
Symptom |
Probable cause |
Diagnosis |
Corrective actions |
|
|
|
|
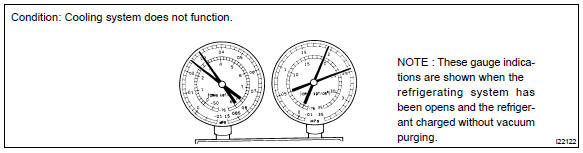
- Air present in refrigeration system
|
Symptom |
Probable cause |
Diagnosis |
Corrective actions |
|
Air entered in refrigerating system |
|
|
- Expansion valve improperly
|
Symptom |
Probable cause |
Diagnosis |
Corrective actions |
|
Trouble in expansion valve |
|
Check expansion valve |
- Defective compression compressor
|
Symptom |
Probable cause |
Diagnosis |
Corrective actions |
|
Internal leak in compressor |
|
Repair or replace compressor |
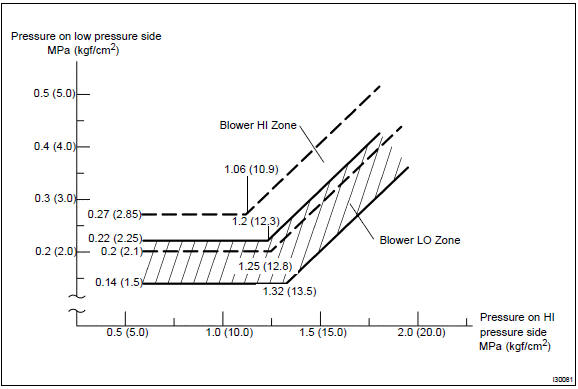
Gauge readings (reference)


Other materials:
Replacement
Hint: components:
1. Precaution
2. Disconnect battery negative terminal
3. Remove front door scuff plate rh
4. Remove rear door scuff plate rh
5. Remove front door opening trim rh
6. Remove rear door opening trim rh
7. Remove lap belt outer anchor cover
8. Remove center pillar garnis ...
Alarm
The alarm uses light and
sound to give an alert when
an intrusion is detected.
The alarm is triggered in the
following situations when
the alarm is set:
A locked door or trunk is
unlocked or opened in any
way other than using the
entry function (if equipped),
wireless remote control,
mechani ...
How to proceed with troubleshooting
The hand–held tester can be used at step 3, 4, 6, 9.
1 Vehicle brought to workshop
2 Customer problem analysis
3 Connect the obd ii scan tool or hand–held tester to dlc3
4 Check and clear dtc and freeze frame data
5 Visual inspection
6 Setting the check mode diagnosis
7 Proble ...