Toyota Corolla (E120) 2002–2008 Repair Manual / Diagnostics / Toyota vehicle intrusion protection system / Light control switch circuit
Toyota Corolla (E120): Light control switch circuit
Wiring diagram
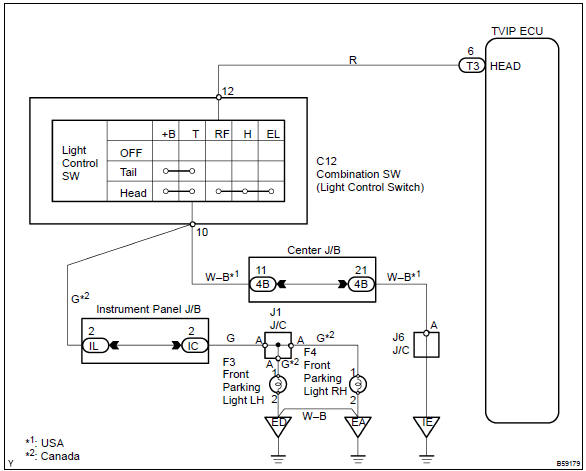
Inspection procedure
1 Check headlamp dimmer switch assy (light control switch)


2 Check wire harness (tvip ecu light control switch)
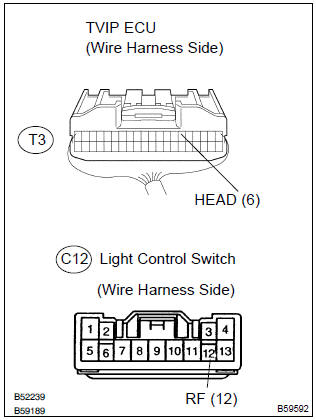
- Disconnect the tvip ecu and light control switch connectors.
- check the continuity between the terminals of the tvip ecu and light control switch connectors, as shown in the illustration and table.
Standard:


3 Check wire harness (light control switch body ground)
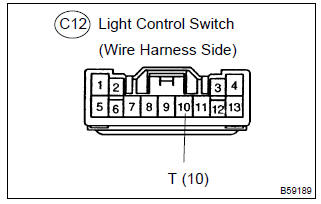
- Disconnect the light control switch connector.
- check the continuity between the terminal of the light control switch connector and the body ground, as shown in the illustration and table.
Standard:


Proceed to next circuit inspection shown on problem symptoms table


Other materials:
Child restraint system
fixed with a child restraint
LATCH anchor (except for
Puerto Rico)
■ Child restraint LATCH
anchors
LATCH anchors are provided for
the outboard rear seat. (Marks
displaying the location of the
anchors are attached to the
seats.)
■ When installing in the rear
outboard seats
Install the child restraint system
in accordance to the operation
manual enclosed with th ...
Dialing from call histories
1 Select “All calls”, “Missed calls”, “Incoming calls” or “Outgoing calls” using
.
2 Select the desired number using
and press the off-hook switch.
The following operations can be performed:
● Registering a number as a speed dial
Press (Add S. Dial) and then press
an ...
Inspection
1. Thermostat
Hint:
the thermostat is numbered with the valve opening temperature.
Immerse the thermostat in water and gradually heat the
water.
check the valve opening temperature.
Valve opening temperature:
80 to 84 c (176 to 183 f)
Hint:
if the valve opening temperatur ...