Toyota Corolla (E120) 2002–2008 Repair Manual / Diagnostics / Supplemental restraint system / Short in p/t squib (rh) circuit / Inspection procedure
Toyota Corolla (E120): Inspection procedure
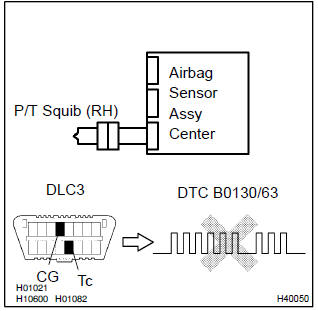
1 Check p/t squib(rh) circuit(airbaga sensor assy center – front seat outer belt assy rh)

- Disconnect the negative (–) terminal cable from the battery, and wait at least for 90 seconds.
- disconnect the connectors between the airbag sensor
assy center and the seat belt pretensioner (rh).
Hint
: make sure that the connector is not damaged (the lock button is not disengaged, or the claw of the lock is not deformed or damaged). If the damage is found, replace the wire harness.
- release the airbag activation prevention mechanism of the connector (on the airbag sensor assy center side) between the airbag sensor assy center and the seat belt pretensioner (rh) .
- for the connector (on the seat belt pretensioner side) between
the airbag sensor assy center and the seat belt pretensioner
(rh), measure the resistance between pr+
and pr–.
Ok: resistance: 1 mΩ or higher


2 Check air bag sensor assy center
Sst 09843–18040

- Connect the connector to the airbag sensor assy center.
- connect the negative (–) terminal cable to the battery, and wait at least for 2 seconds.
- turn the ignition switch to on, and wait at least for 20 seconds.
- clear the dtc stored in memory .
- turn the ignition switch to lock, and wait at least for 20 seconds.
- turn the ignition switch to on, and wait at least for 20 seconds.
- check the dtc .
Ok: dtc b0130/63 is not output.
Hint
: codes other than code b0130/63 may be output at this time, but they are not relevant to this check.


3 Check p/t squib (rh)
Sst 09843–18040
- Turn the ignition switch to lock.
- disconnect the negative (–) terminal cable from the battery, and wait at least for 90 seconds.
- connect the seat belt pretensioner (rh) connector.
- connect the negative (–) terminal cable to the battery, and wait at least for 2 seconds.
- turn the ignition switch to on, and wait at least for 20 seconds.
- clear the dtc stored in memory .
- turn the ignition switch to lock, and wait at least for 20 seconds.
- turn the ignition switch to on, and wait at least for 20 seconds.
- check the dtc .
Ok: dtc b0130/63 is not output.
Hint
: codes other than code b0130/63 may be output at this time, but they are not relevant to this check.


Use simulation method to check


Other materials:
Circuit description
Refer to dtc p0130
Hint:
the ecm provides a pulse width modulated control circuit to adjust current
through the heater. The heated
oxygen sensor heater circuit uses a relay on the b+ side of the circuit.
Monitor description
The ecm uses the heated oxygen sensor information to regulate t ...
Circuit description
Refer to dtc p0115
Dtc no.
Dtc detection condition
Trouble area
P0125
If the engine coolant temperature (ect) was less than –6.6 °C
(20 °F) when starting the engine, and 20 minutes after the engine
start, the ect sensor still indicates below 20 °C (68 ...
Windshield wiper motor assy
Replacement
1. Remove windshield wiper arm cover
2. Remove fr wiper arm rh
operate the wiper and stop the windshield wiper motor assy at the
automatic stop position.
remove a nut and fr wiper arm rh.
3. Remove fr wiper arm lh
remove a nut and fr wiper arm lh.
4 ...