Toyota Corolla (E120): Inspection
1. Headlamp dimmer switch assy
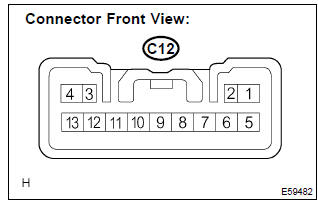
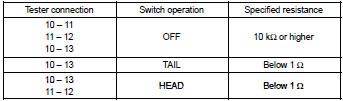
- Inspect light control switch continuity.
- Measure the resistance according to the value(s) in the table below.
Standard:
- Inspect headlight dimmer switch continuity.
- Measure the resistance according to the value(s) in the table below.
Standard:
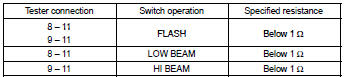
Hint
: turn light control switch to the head position when checking ”low beam” and ”hi beam”.
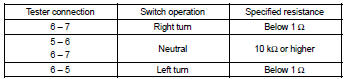
- inspect turn signal switch continuity.
- Measure the resistance according to the value(s) in the table below.
Standard:
- W/ fog light: inspect front fog light switch continuity.
- Measure the resistance according to the value(s) in the table below.
Standard:

2. Back up lamp switch assy
- measure the resistance according to the value(s) in the table below.
Standard:

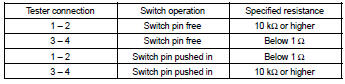
3. Stop lamp switch assy (w/o cruise control)
- measure the resistance according to the value(s) in the table below.
Standard:

4. Stop lamp switch assy (w/ cruise control)
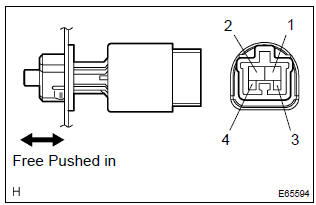
- Measure the resistance according to the value(s) in the table below.
Standard:
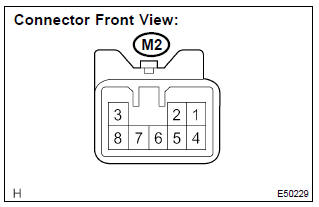
5. Hazard warning signal switch assy
- Measure the resistance according to the value(s) in the table below.
Standard:

- Inspect illumination operation.
- Connect the positive (+) lead from the battery to terminal 5 and the negative (–) lead to terminal 4, then check that the illumination comes on.
6. Front door courtesy lamp switch assy
- measure the resistance according to the value(s) in the table below.
Standard:

7. Rear door courtesy lamp switch assy
- measure the resistance according to the value(s) in the table below.
Standard:

8. Luggage compartment room courtesy lamp switch assy
- measure the resistance according to the value(s) in the table below.
Standard:

9. Map lamp assy (w/o sliding roof)
- Measure the resistance according to the value(s) in the table below.
Standard:

- Connect the positive (+) lead from the battery to terminal 1 and the negative (–) lead to terminal 6, then check that the illumination comes on when switch operation is on position.
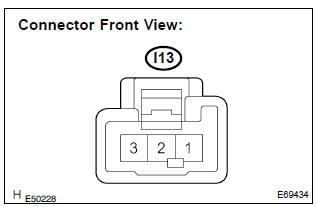
10. Map lamp assy (w/ sliding roof)
- Measure the resistance according to the value(s) in the table below.
Standard:

- Connect the positive (+) lead from the battery to terminal 1 and the negative (–) lead to terminal 3, then check that the illumination comes on when switch operation is on position.
11. Room lamp assy no.1
- Connect the positive (+) lead from the battery to terminal 1 and the negative (–) lead to terminal 2, then check that the illumination comes on .
13. Headlamp relay
- Measure the resistance according to the value(s) in the table below.
Standard:

14. Fog lamp relay

- Measure the resistance according to the value(s) in the table below.
Standard:

15. Taillamp relay

- Measure the resistance according to the value(s) in the table below.
Standard:

16. Headlamp dimmer relay

- Measure the resistance according to the value(s) in the table below.
Standard:

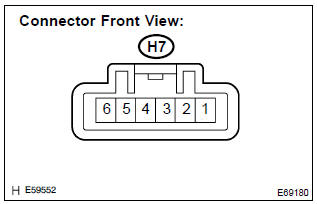
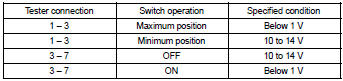
17. Light control rheostat
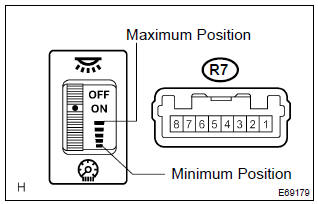
- Connect the connector to the rheostat and inspect the wire harness side connector from the back side as shown in the table below.
Standard:
- Inspect illumination operation.
- Connect the positive (+) lead from the battery to terminal 2 and the negative (–) lead to terminal 3, then check that the illumination comes on.


Other materials:
Circuit description
This circuit turns on the magnetic clutch inside the actuator during cruise
control operation according to the
signal from the ecu. If a malfunction occurs in the actuator or speed sensor,
etc. During cruise control operation,
the rotor shaft between the motor and control plate is released.
...
Precaution
Caution:
replace the faulty parts of the seat belt systems (outer belt, inner belt,
bolts, nuts, adjustable shoulder
anchor, tether anchor hardware, sill–bar, etc.).
Seat belt systems not in use at the time of a collision should also be inspected
and replaced if found
to be damaged or wo ...
Rear axle lh hub bolt
Replacement
Hint: components:
1. Remove rear wheel
2. Remove rear brake drum sub–assy
3. Remove rear axle lh hub bolt
Using sst and a hammer handle or an equivalent, remove
the lh hub bolt.
Sst 09628–10011
4. Install rear axle lh hub bolt
Install a washer and nut to a ...