Toyota Corolla (E170): Front seats
Adjustment procedure
► Manual seat
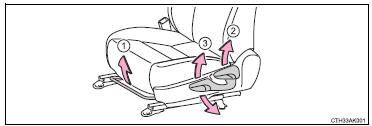
1 Seat position adjustment lever 2 Seatback angle adjustment lever 3 Vertical height adjustment lever (driver’s side only)
► Power seat (driver’s side only)
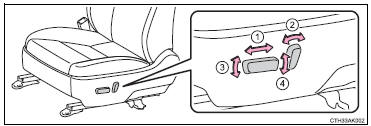
1 Seat position adjustment switch 2 Seatback angle adjustment switch 3 Seat cushion (front) angle adjustment switch 4 Vertical height adjustment switch
CAUTION
■Seat adjustment
●Be careful that the seat does not hit passengers or luggage.
●Do not recline the seat more than necessary when the vehicle is in motion to reduce the risk of sliding under the lap belt.
If the seat is too reclined, the lap belt may slide past the hips and apply restraint forces directly to the abdomen or your neck may contact the shoulder belt, increasing the risk of death or serious injury in the event of an accident.
●Manual seat only: After adjusting the seat, make sure that the seat is locked in position.
■When adjusting the seat positions
Make sure to leave enough space around the feet so they do not get stuck.


Other materials:
Odometer and trip meter
display
■ Changing the display
Press the display change button
until the desired item is displayed.
■ Display items
Odometer
Displays the total distance the vehicle
has been driven.
Trip meter A/Trip meter B
Displays the distance the vehicle
has been driven since the meter
was last reset. Trip ...
Using the interior lights
Interior lights list
1 Front interior light/personal lights
2 Rear interior light
3 Engine switch light (vehicles with a smart key system)
Front interior light/personal lights
■ Front interior light
► Type A
► Type B
1 Off
2 Door position
3 On
■ Personal li ...
Uniform Tire Quality Grading
This information has been prepared in accordance with regulations issued by the
National Highway Traffic Safety Administration of the U.S. Department of Transportation.
It provides the purchasers and/or prospective purchasers of Toyota vehicles with
information on uniform tire quality grading.
...