
Toyota Corolla (E170) 2014–2019 Owners Manual / Operation of each component / Adjusting the seats / Outside rear view mirrors / Folding the mirrors
Toyota Corolla (E170): Folding the mirrors
Push the mirror back in the direction of the vehicle’s rear.
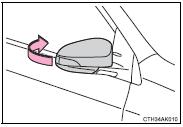
■Mirror angle can be adjusted when
► Vehicles without a smart key system The engine switch is in the “ACC” or “ON” position.
►Vehicles with a smart key system The engine switch is in ACCESSORY or IGNITION ON mode.
■When the mirrors are fogged up (if equipped)
The outside rear view mirrors can be cleared using the mirror defoggers. Turn on the rear window defogger to turn on the outside rear view mirror defoggers.
CAUTION
■Important points while driving
Observe the following precautions while driving.
Failure to do so may result in loss of control of the vehicle and cause an accident, resulting in death or serious injury.
●Do not adjust the mirrors while driving.
●Do not drive with the mirrors folded.
●Both the driver and passenger side mirrors must be extended and properly adjusted before driving.
■When a mirror is moving
To avoid personal injury and mirror malfunction, be careful not to get your hand caught by the moving mirror.
■When the mirror defoggers are operating (if equipped
) Do not touch the rear view mirror surfaces, as they can become very hot and burn you.


Other materials:
Steering column
Service data
Torque specification
Power steering
Service data
Torque specification
: For use without sst ...
Replacement
Hint: components:
1. Place front wheels facing straight ahead
2. Remove front wheels
3. Remove engine under cover lh
4. Remove engine under cover rh
5. Remove exhaust pipe
6. Drain transaxle oil
7. Remove hood sub–assy
8. Remove cylinder head cover no.2
9. Remove air cleaner assy
10. R ...
Wiper rubber lh
Replacement
1. Remove fr wiper blade lh
remove the front wiper blade lh from the front wiper arm lh.
Notice:
do not fold down the front wiper arm with the front wiper blade being removed
from it.
2. Remove wiper rubber lh
remove the front wiper rubber lh from the front wi ...