Toyota Corolla (E120) 2002–2008 Repair Manual / Automatic transmission / trans / Floor shift cable transmission control select
Toyota Corolla (E120): Floor shift cable transmission control select
Replacement
Hint
: components:
1. Remove air conditioner unit assy
H
int
: refer to the instructions for removal of the air conditioner unit assy.
2. Separate air bag sensor assy center
- remove the 3 bolts, separate the airbag sensor assy center.
3. Remove exhaust pipe assy
4. Remove front floor heat insulator no.1
- remove the 3 nuts and heat insulator no.1.
5. Remove floor shift cable transmission control select
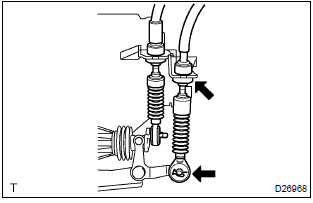
- Remove the clip and washer, separate the top of the select cable from the transaxle.
- remove the clip, separate the select cable from the control cable bracket.
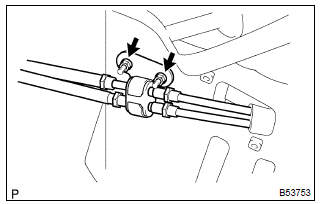
- Remove the 2 nuts and clamp.

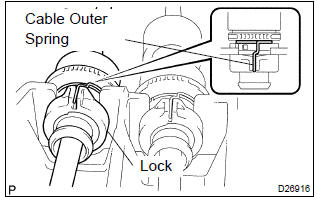
- Using a screwdriver, release the cable outer spring.
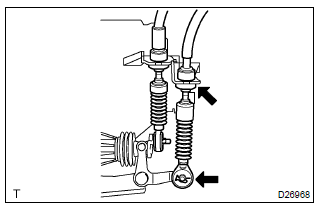
- turn the lock, separate the select cable from the shift lever retainer.
- Separate the end of the select cable from the shift lever assy.
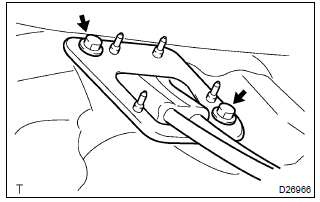
- Remove the 2 bolts and retainer from the floor.
- pull out the control cable assy from the floor.
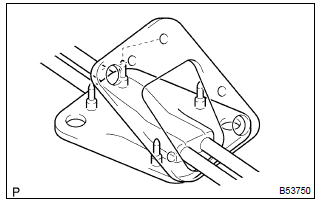
- Remove the retainer from the grommet.
- remove the select cable from the grommet.
6. Install floor shift cable transmission control select
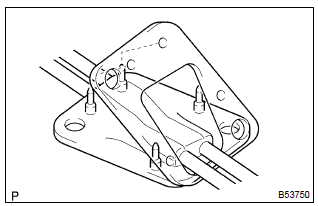
- Install the select cable to the grommet.
- install the retainer to the grommet.
Notice
: fit 4 projections of the grommet into 4 holes of the retainer.
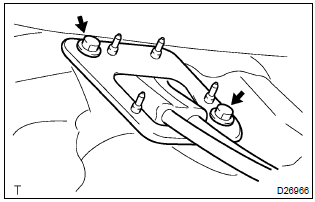
- Install the control cable assy with the 2 bolts.
Torque: 5.0 Nvm (51 Kgf·cm, 44 in.Vlbf)

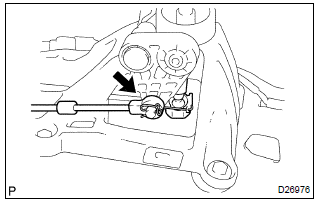
- Connect the end of the select cable to the shift lever assy.
- Connect the select cable to the retainer of shift lever assy,
turn the lock.
Notice
: the projecting part of the lock should face upward when the select cable is installed.
- install the cable outer spring to the lock.
Notice
: make sure that after installation the cable outer spring is moved to the place shown in the illustration.
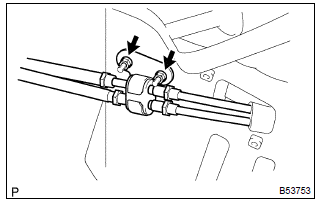
- Install the clamp with the 2 nuts.
Torque: 5.0 Nvm (51 Kgf·cm, 44 in.Vlbf)
- Connect the select cable to the control cable bracket, install a new clip.
- connect the select cable to the transaxle, install the washer and clip.
7. Install front floor heat insulator no.1
- install the heat insulator no.1 With the 3 nuts.
8. Install exhaust pipe assy
9. Connect air bag sensor assy center
- install the airbag sensor assy center with the 3 bolts.
Torque: 17.5 Nvm (178 Kgf·cm, 13 ft·lbf)
10. Inspect srs warning light


Other materials:
Replacement
1. Work for preventing gasoline from spilling out
2. Remove engine under cover rh
3. Drain coolant
4. Remove front wheel rh
5. Remove cylinder head cover no.2
Remove the 2 nuts, 2 clips and cylinder head cover.
6. Remove air cleaner hose no.1
loosen the 2 air cleaner hose ...
Replacement
Hint:
installation is in the reverse order of the removal. But the
installation is indicated only when it has a
point.
In the lh side, work in the same procedure as in the rh side.
1. Disconnect battery negative terminal
2. Remove front seat assembly rh
3. Remove front seat inner be ...
Making a phone call
To enter the “PHONE” mode, press the off-hook switch.
■ Making a phone call
● Dialing by selecting a name
● Speed dialing
● Dialing by entering the number
● Dialing from call histories
■ Receiving a phone call
● Answering the phone
● Refusi ...