Toyota Corolla (E120) 2002–2008 Repair Manual / Diagnostics / Combination meter / Entire combination meter does not operate
Toyota Corolla (E120): Entire combination meter does not operate
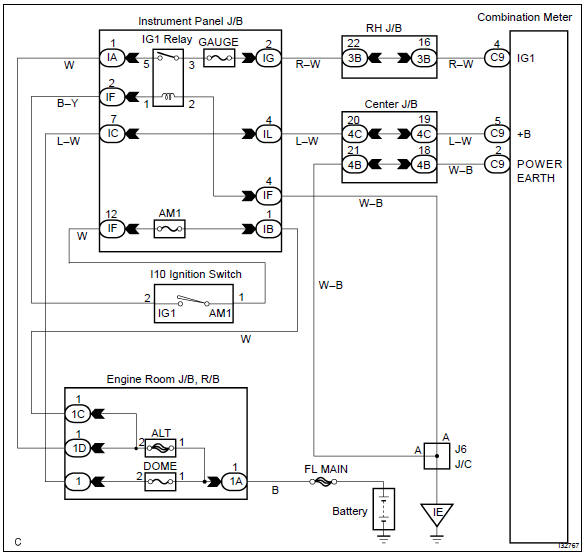
Wiring diagram
Inspection procedere
1 Check fuse
- Check that continuity exists of dome fuse.
- check that continuity exists of gauge fuse.
- check that continuity exists of am1 fuse.


2 Inspect combination meter assy
- Check continuity.
- Disconnect the ”c9” connector from combination meter assy.
- Check continuity between terminal c9–2 of combination
meter assy connector and body ground.
Ok: continuity exists
- Check voltage.
- Disconnect the ”c9” connector from combination meter assy.
- Measure voltage between terminal c9–5 of combination
meter assy connector and body ground.
Voltage: 10 – 14 v
- turn the ignition switch to on.
- Measure voltage between terminal c9–4 of combination
meter assy connector and body ground.
Voltage: 10 – 14 v


Check and replace combination meter assy


Other materials:
Moon roof
Use the overhead switches to open and close the moon roof and tilt it up and
down.
■ Opening and closing
1 Opens the moon roof* The moon roof stops slightly before the fully open position
to reduce wind noise.
Press the switch again to fully open the moon roof.
2 Closes the moon roof*
...
Data list/active test
1. Data list
Hint:
according to the data list displayed by the obd ii scan tool or hand–held
tester, you can read the value
of the switch, sensor, actuator and so on without parts removal. Reading the
data list as the first step of
troubleshooting is one method to shorten labor time.
W ...
Installing the spare tire
1 Remove any dirt or foreign matter from the wheel contact surface.
If foreign matter is on the wheel contact surface, the wheel nuts may loosen
while the vehicle is in motion, causing the tire to come off.
2 Install the tire and loosely tighten each wheel nut by hand by approximately
the sa ...