Toyota Corolla (E120) 2002–2008 Repair Manual / Engine control system / Ecm (1zz–fe)
Toyota Corolla (E120): Ecm (1zz–fe)
Replacement
1. Disconnect battery negative terminal
2. Remove glove compartment door assy
3. Remove ecm

- Remove the 2 clips using a clip remover. Then, open the cover.
- Disconnect the 4 ecm connectors.
- remove the wire harness from the wire harness clamp.
- Remove the 2 bolts.
- unfasten the claw and clip, then remove the ecm.
4. Remove ecm cover
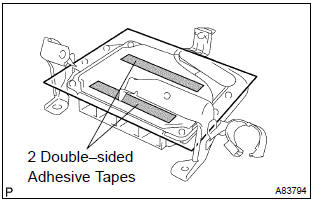
- Take the 2 double–sided adhesive tapes off the ecm, then remove the ecm cover.
5. Remove ecm bracket no.2 (Denso made)
- Remove the 2 screws, then remove the ecm bracket no.
2.
6. Remove ecm bracket no.1
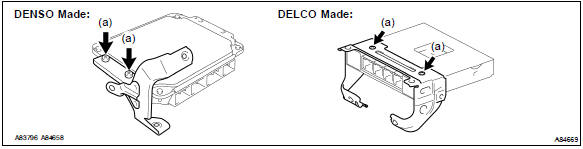
- Remove the 2 screws, then remove the ecm bracket no.
7. Remove ecm bracket no.3 (Delco made)
- Remove the 2 screws, then remove the ecm bracket no.
8. Install ecm bracket no.3 (Delco made) torque: 3.2 Nvm (33 kgfvcm, 28 in.Vlbf)
9. Install ecm bracket no.1 Torque: 3.2 Nvm (33 kgfvcm, 28 in.Vlbf)
10. Install ecm bracket no.2 (Denso made) torque: 3.2 Nvm (33 kgfvcm, 28 in.Vlbf)
11. Install ecm cover
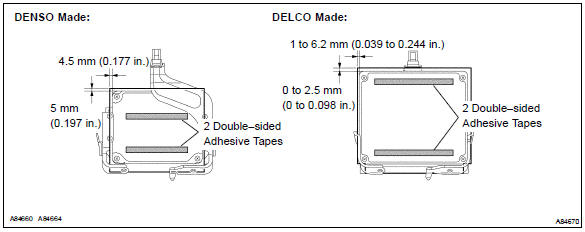
- Install a new ecm cover to the ecm as shown in the illustration.
12. Install ecm torque: 3.0 Nvm (31 kgfvcm, 27 in.Vlbf)
13. Install glove compartment door assy
14. Connect battery negative terminal torque: 5.4 Nvm (55 kgfvcm, 48 in.Vlbf)
15. Reset memory (a/t transaxle)
Caution
: perform the reset memory (at initialization) when replacing the ecm, engine assembly or automatic transaxle assembly.
- The hand–held tester only.
- Connect the hand–held tester to the dlc3.
- Turn the ignition switch on.
- Perform the reset memory procedure from the engine menu.
Caution
: after performing the reset memory, be sure to perform the road test as described earlier.


Other materials:
Driving assist systems
To help enhance driving safety and performance, the following systems operate
automatically in response to various driving situations. Be aware, however, that
these systems are supplementary and should not be relied upon too heavily when operating
the vehicle.
◆ ABS (Anti-lock Brake Sys ...
How to proceed with troubleshooting
1 Vehicle brought to workshop
2 Customer problem analysis
3 Check and clear dtc
4 Problem symptom confirmation
5 Symptom simulation
6 Dtc check
7 Dtc chart
8 Problem symptoms table
9 Circuit inspection
10 Identification of problem
11 Parts inspection
12 Repair
1 ...
Audio & visual system
Preparation
Sst
Recomended tools
Equipment
...