Toyota Corolla (E120): Data list/active test
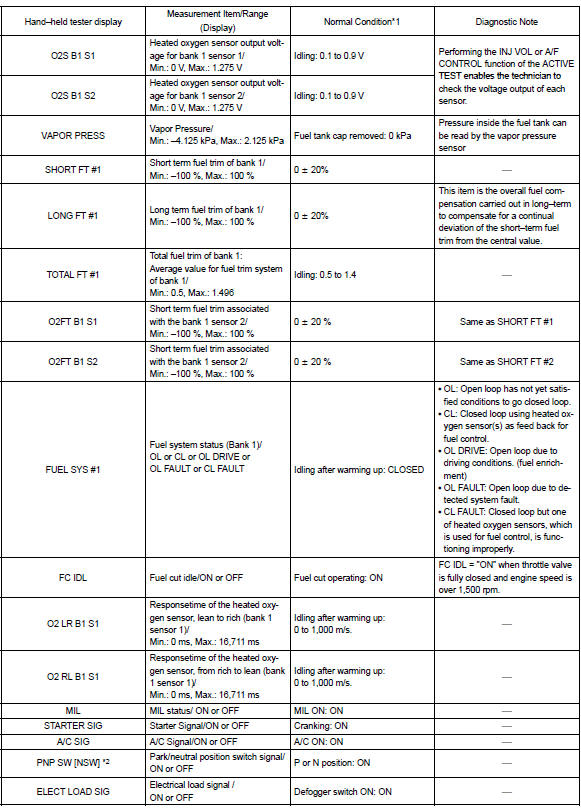
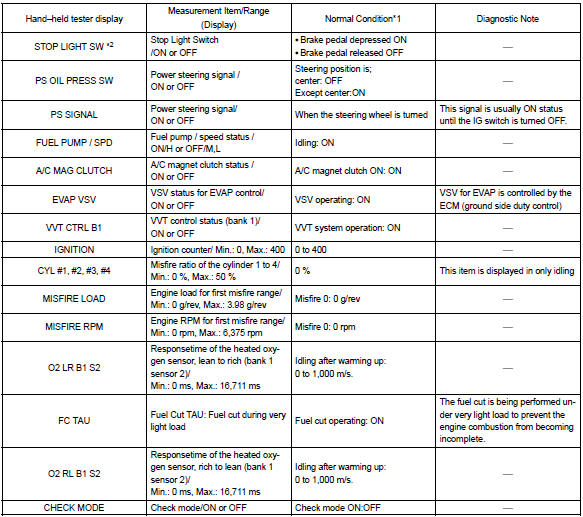
1. Data list
Hint
: using the data list displayed by the hand–held tester or the obd ii scan tool, you can read the value of the switches, sensors, actuators and so on without parts removal. Reading the data list as a first step of troubleshooting is one method to shorten diagnostic time.
Notice
: the values given below for ”normal condition” are representative values. A vehicle may still be normal even if its value differs from those listed here. Do not solely depend on the ”normal condition” here when deciding whether a part is faulty or not.
- Warm up the engine.
- turn the ignition switch off.
- connect the hand–held tester or the obd ii scan tool to the dlc3.
- turn the ignition switch on.
- push the ”on” button of the hand–held tester or the obd ii scan tool.
- select the item ”diagnosis / enhanced obd ii / data list”.
- according to the display on the tester, read the ”data list”.
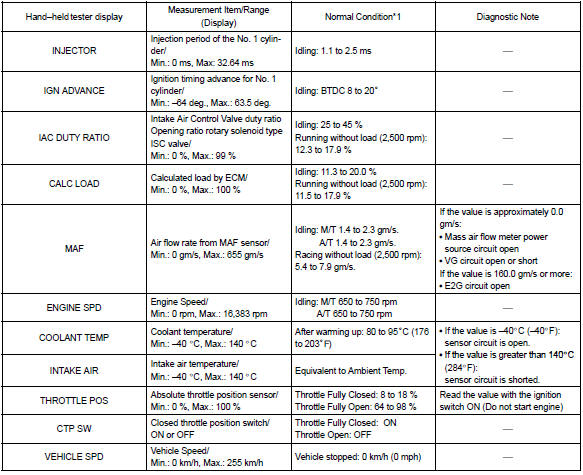
*1: If no conditions are specifically stated for ”ldling”, it means the shift lever is in the n or p position, the a/c switch is off and all accessory switches are off.
*2: A/t only
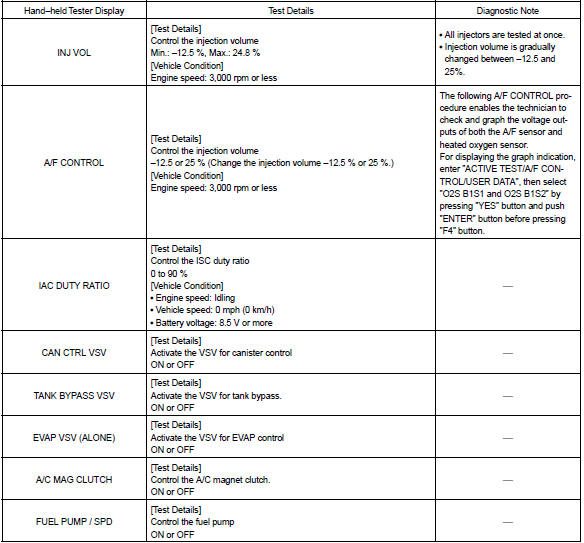
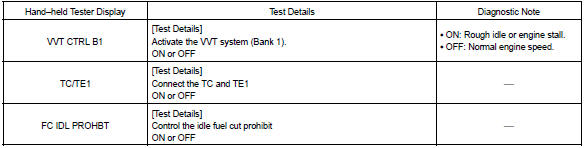
2. Active test
Hint
: performing the active test using the hand–held tester or the obd ii scan tool allows the relay, vsv, actuator and so on to operate without parts removal. Performing the active test as a first step of troubleshooting is one method to shorten diagnostic time.
It is possible to display the data list during the active test.
- warm up the engine.
- turn the ignition switch off.
- connect the hand–held tester or the obd ii scan tool to the dlc3.
- turn the ignition switch on.
- push the ”on” button of the hand–held tester or the obd ii scan tool.
- select the item ”diagnosis / enhanced obd ii / active test”.
- according to the display on the tester, perform the ”active test”.


Other materials:
Overhaul
Hint:
overhaul the rh side by the same procedure as the lh side.
1. Remove front wheel
2. Drain brake fluid
Notice:
wash the brake fluid off immediately if it comes into contact with any painted
surface.
3. Remove front disc brake cylinder sub–assy
Remove the union bolt and gasket ...
Overhaul
1. Remove bench type rear seat cushion assy
Disengage the 2 clamps, and then remove the seat cushion.
2. Remove bench type rear seat back assy
remove the headrests.
remove the 2 bolts and seat back.
3. Remove bench type rear seat cushion
cover
remove the ho ...
Glossary of tire terminology
*: Table 1 - Occupant loading and distribution for vehicle normal load for various
designated seating capacities
...