Toyota Corolla (E120) 2002–2008 Repair Manual / Diagnostics / Sfi system / Crankshaft position sensor ”a”
circuit / Circuit description
Toyota Corolla (E120): Circuit description
The crankshaft position sensor (ne signal) consists of a magnet, iron core and pickup coil.
The ne signal plate (crankshaft position sensor plate) has 34 teeth and is installed on the crankshaft. The ne signal sensor generates 34 signals for each engine revolution. This sensor monitors a plate (timing rotor) located on the crankshaft timing pulley and is used by the ecm to detect crankshaft angle and engine speed (rpm/ne). As the crankshaft timing pulley rotates through an engine revolution, this sensor communicates the rotation of the ne signal plate as a pulse signal to the ecm. Based on the signal, the ecm controls fuel injection time and ignition timing.
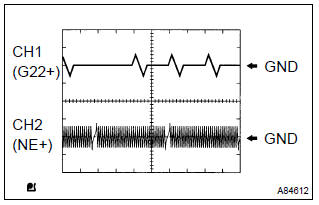
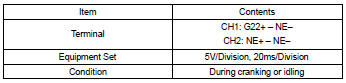
Reference: inspection using the oscilloscope.
Hint
: the correct waveform is as shown on the left.
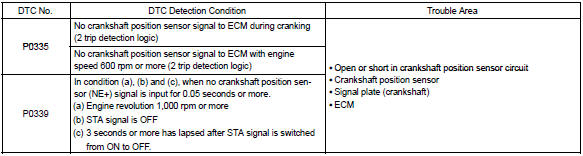
Monitor description
If there is no signal from the crankshaft sensor despite the engine revolving, the ecm interprets this as a malfunction of the sensor.
Monitor strategy
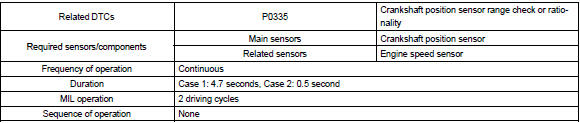
Typical enabling conditions
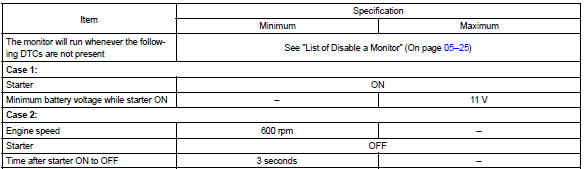
Typical malfunction thresholds

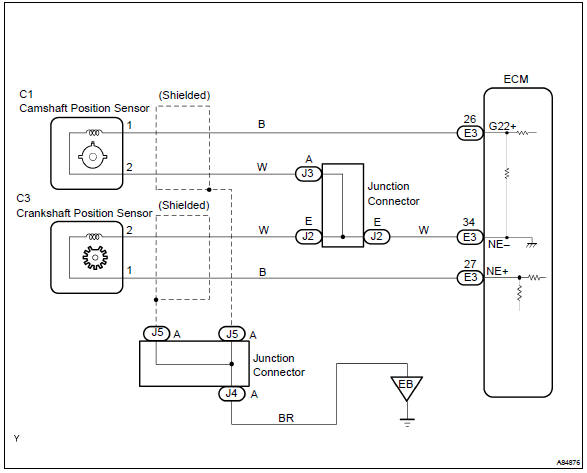
Wiring diagram


Other materials:
Windshield wiper motor assy
Replacement
1. Remove windshield wiper arm cover
2. Remove fr wiper arm rh
operate the wiper and stop the windshield wiper motor assy at the
automatic stop position.
remove a nut and fr wiper arm rh.
3. Remove fr wiper arm lh
remove a nut and fr wiper arm lh.
4 ...
Making a phone call
To enter the “PHONE” mode, press the off-hook switch.
■ Making a phone call
● Dialing by selecting a name
● Speed dialing
● Dialing by entering the number
● Dialing from call histories
■ Receiving a phone call
● Answering the phone
● Refusi ...
Customer problem analysis
Hint:
in troubleshooting, the problem symptoms must be confirmed
accurately, meaning that all preconceptions
must be set aside in order to make an accurate judgement. To ascertain what
the problem symptoms
are, it is extremely important to ask the customer about the problem and
cond ...