
Toyota Corolla (E170) 2014–2019 Owners Manual / Interior features / Bluetooth® phone (Multimedia system) / Bluetooth® phone message function
Toyota Corolla (E170): Bluetooth® phone message function
Received messages can be forwarded from the connected Bluetooth® phone, enabling checking and replying using the multimedia system.
Depending on the type of Bluetooth® phone connected, received messages may not be transferred to the message inbox.
If the phone does not support the message function, this function cannot be used.
Displaying “Message Inbox” screen
1 Press the “SETUP” button.
2 Select “Phone”.
3 Select  .
.
Receiving a message
When an e-mail/SMS/MMS is received, the incoming message screen pops up with sound and is ready to be operated on the screen.
1 Select to check the message.
2 Select to refuse the message.
3 Select to call the message sender.
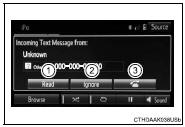
■Receiving a message
●Depending on the cellular phone used for receiving messages, or its registration status with the navigation system, some information may not be displayed.
●The pop up screen is separately available for incoming e-mail and SMS/ MMS messages under the following conditions:
E-mail:
• “Incoming E-mail Display” is set to “Full Screen”.
• “E-mail Notification Popup” is set to on.
SMS/MMS:
• “Incoming SMS/MMS Display” is set to “Full screen”.
• “SMS/MMS Notification Popup” is set to on.


Other materials:
Using the radio
Radio operation
Select “AM” or “FM” to begin listening to the radio.
1 Power
2 Volume
3 Station selectors
4 Adjust frequency or select an item
5 AM/FM mode button
6 Scan for receivable stations
7 Seek a frequency
Setting station presets
1Search for a desired station by turning
...
Problem symptoms table
When the malfunction code is not confirmed in the diagnostic trouble code
check and the problem still can
not be confirmed in the basic inspection, proceed to this problem symptoms
tables and troubleshoot according
to the numbered order given below.
*: A/t only ...
Using a top tether anchorage
(for Puerto Rico)
■ Top tether anchorages
Top tether anchorages are provided
for each rear seat.
Use top tether anchorages
when fixing the top strap.
Top tether anchorages
Top strap
■ Fixing the top strap to the
top tether anchorages
Install the child restraint system
in accordance to the operation
manual e ...