Toyota Corolla (E120): Basic inspection
When the malfunction is not confirmed in the dtc check, troubleshooting should be carried out in all the possible circuits considered as causes of the problem. In many cases, by carrying out the basic engine check shown in the following flowchart, the location causing the problem can be found quickly and efficiently. Therefore, using this check is essential in the engine troubleshooting.
1 Check battery voltage
Notice
: carry out this check with the engine stopped and ignition switch off.

Ng charge or replace battery

2 Check if engine will crank
Ng proceed to problem symptoms table on page
3 Check if engine starts
Ng go to step 7
4 Check air filter
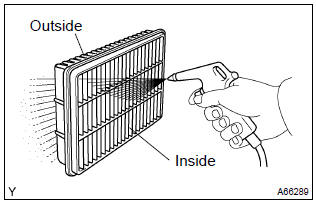
- Visually check that the air filter is not excessively dirty or oily.
Notice
: if necessary, clean the filter with compressed air. First blow from the inside thoroughly, then blow from the outside of the filter.
Ng clean or replace
5 Check idle speed
Ng proceed to problem symptoms table on page
6 Check ignition timing
Ng proceed to page 14–1 and continue to troubleshoot
Proceed to problem symptoms table on page
7 Check fuel pressure
Ng proceed to page 11–1 and continue to troubleshoot
8 Check for spark
Ng proceed to page 18–1 and continue to troubleshoot
Proceed to problem symptoms table on page


Other materials:
Eco drive mode (if equipped)
Press the switch.
Suitable for enhancing the fuel economy, because the torque corresponding to
the accelerator pedal depression amount can be generated more smoothly than it is
in normal conditions and the operation of the air conditioning system (heating/cooling)
will be minimized.
Press th ...
Message Settings
1 Display the “Phone/Message Settings” screen. 2 Select “Messaging Settings”.
3 Select the desired item to be set.
1 Set automatic message transfer on/off.
2 Set automatic message readout on/off.
3 Set the SMS/MMS notification popup on/off.
4 Set the e-mail notification popup on/off.
5 ...
Moon roof
Use the overhead switches to open and close the moon roof and tilt it up and
down.
■ Opening and closing
1 Opens the moon roof* The moon roof stops slightly before the fully open position
to reduce wind noise.
Press the switch again to fully open the moon roof.
2 Closes the moon roof*
...