Toyota Corolla (E120) 2002–2008 Repair Manual / Audio & visual / Antenna cord sub–assy
Toyota Corolla (E120): Antenna cord sub–assy
Replacement
Hint
: components:
1. Remove instrument panel sub–assy upper
Hint
:
- refer to the procedure until the step, ”remove instrument panel sub–assy upper” of instrument panel sub–assy lower.
- Remove the related parts as long as the antenna cord sub–assy can be removed.
2. Remove visor holder
Hint
:
- refer to the procedure until the step, ”remove visor holder” of roof headlining assy.
- Remove the parts related to the roof headlining assy in the range that antenna cord can be cut off.
3. Remove sun roof opening trim moulding (w/ sliding roof)
4. Disconnect antenna cord sub–assy
- Rear side: disconnect the connector and antenna cord plug.
- rear side: remove the 2 clamps.
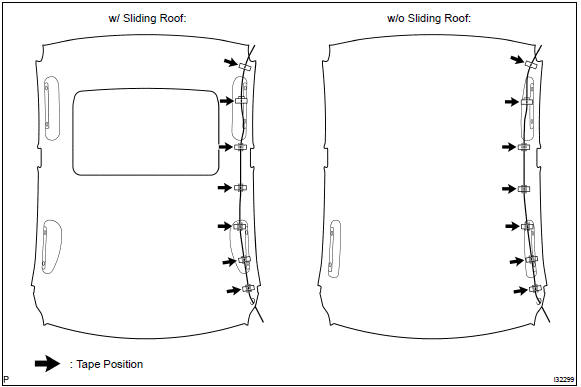
- Front side: remove the 9 clamps.
5. Remove roof headlining assy
Notice
: do not bend the roof headlining assy.
6. Remove antenna cord sub–assy
- remove the antenna cord sub–assy from the roof headlining.
7. Install antenna cord sub–assy
- tape the antenna cord sub–assy at the position of the roof headlining shown in the illustration.
Notice
:
- the antenna cord sub–assy should come to the center of the tape (100 mm(3.94 In.) X 25 mm(0.98 In.)) When taped.
- Try not to touch the adhesive side of the tape when taping.
- Install the roof headlining assy .
- engage the 9 clamps at the front side of antenna cord.
- connect the plug and connector at the rear side of antenna cord.
8. Install rear seat back assy (fixed type rear seat)
9. Install rear seat back assy (separated type rear seat)
10. Install bench type rear seat cushion assy( or 72–8)
11. Install instrument panel sub–assy upper
Hint
: refer to the procedure until the step, ”install instrument panel sub–assy upper” of instrument panel sub–assy lower.


Other materials:
Temporarily engaged gear steps selection mode in the D position
To drive in temporary gear steps selection mode, operate the “-” and “+” paddle
shift switches. The gear steps can then be selected by operating the “-” and “+”
paddle shift switches. By selecting gear step using paddle shift switches, you can
control engine braking forces.
1 ...
Gauges and meters (multi-information display)
The displayed content may differ depending on the type of meter.
1 Tachometer
Displays the engine speed in revolutions per minute.
2 Speedometer
3 Fuel gauge
4 Multi-information display
The multi-information display presents the driver with a variety of drivingrelated
data including the cu ...
Inspection
1. Spark plug
Notice:
never use a wire brush for cleaning.
Never attempt to adjust the electrode gap on used
spark plug.
Spark plug should be replaced every 192,000 km
(120,000 miles).
Clean the spark plugs.
Air pressure: below 588 kpa (6.0 Kg/cm2, 85 psi)
duration: 20 sec ...