Toyota Corolla (E120) 2002–2008 Repair Manual / Audio & visual / Antenna cord sub–assy
Toyota Corolla (E120): Antenna cord sub–assy
Replacement
Hint
: components:
1. Remove instrument panel sub–assy upper
Hint
:
- refer to the procedure until the step, ”remove instrument panel sub–assy upper” of instrument panel sub–assy lower.
- Remove the related parts as long as the antenna cord sub–assy can be removed.
2. Remove visor holder
Hint
:
- refer to the procedure until the step, ”remove visor holder” of roof headlining assy.
- Remove the parts related to the roof headlining assy in the range that antenna cord can be cut off.
3. Remove sun roof opening trim moulding (w/ sliding roof)
4. Disconnect antenna cord sub–assy
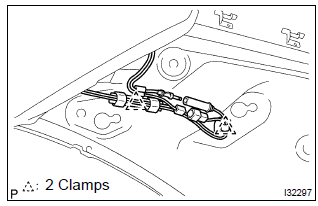
- Rear side: disconnect the connector and antenna cord plug.
- rear side: remove the 2 clamps.
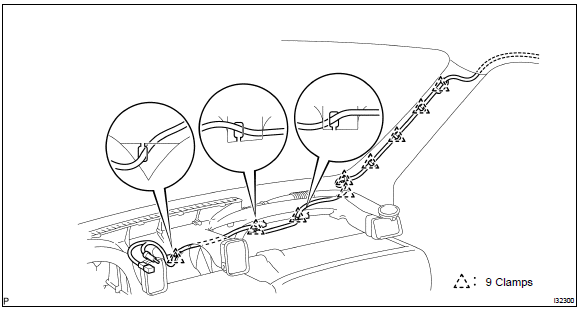
- Front side: remove the 9 clamps.
5. Remove roof headlining assy
Notice
: do not bend the roof headlining assy.
6. Remove antenna cord sub–assy
- remove the antenna cord sub–assy from the roof headlining.
7. Install antenna cord sub–assy
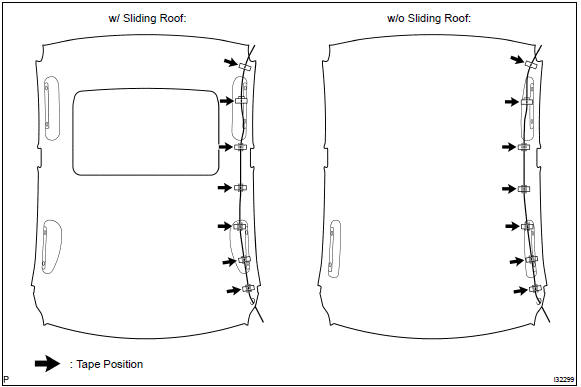
- tape the antenna cord sub–assy at the position of the roof headlining shown in the illustration.
Notice
:
- the antenna cord sub–assy should come to the center of the tape (100 mm(3.94 In.) X 25 mm(0.98 In.)) When taped.
- Try not to touch the adhesive side of the tape when taping.
- Install the roof headlining assy .
- engage the 9 clamps at the front side of antenna cord.
- connect the plug and connector at the rear side of antenna cord.
8. Install rear seat back assy (fixed type rear seat)
9. Install rear seat back assy (separated type rear seat)
10. Install bench type rear seat cushion assy( or 72–8)
11. Install instrument panel sub–assy upper
Hint
: refer to the procedure until the step, ”install instrument panel sub–assy upper” of instrument panel sub–assy lower.


Other materials:
Inspection procedure
1 Check security indicator light
Set the system in 30 seconds after filliping the security indicator to
check if the alarm is triggered.
2 Check glass breakage sensor ecu (glass breakage sensor)
Check the continuity and voltage of the glass breakage
sensor ecu, as shown in th ...
Circuit description
1 Check p squib circuit(airbag sensor assy center – instrument
panel passenger airbag assy)
Disconnect the negative (–) terminal cable from the battery,
and wait at least for 90 seconds.
disconnect the connectors between the airbag sensor
assy center and the instrument panel ...
Hood
Adjustment
Hint:
since the centering bolt is used as a hood hinge and hood lock
set bolt, the hood and hood lock can not be adjusted with it on.
Substitute a bolt with washer for the centering bolt.
1. Inspect hood sub–assy
Check that the clearance is within the standard value.
...