Toyota Corolla (E120) 2002–2008 Repair Manual / Audio & visual / Amplifier antenna assy
Toyota Corolla (E120): Amplifier antenna assy
Replacement
Hint
: components:
- Remove roof headlining assy
Notice
: do not bend the roof headlining assy.
Hint
:
- refer to the procedure from ”remove roof headlining assy” of roof headlining assy.
- Remove the related parts as long as the amplifier antenna assy can be removed.
2. Remove roof antenna pole sub–assy
3. Remove amplifier antenna assy
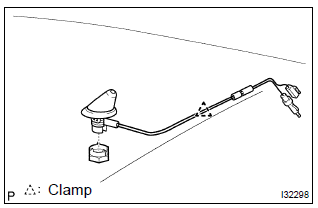
- Disconnect the connector and antenna cord plug.
- remove the clamp.
- remove the antenna nut and amplifier antenna assy.
4. Install amplifier antenna assy
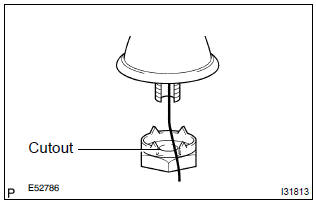
- Set the amplifier antenna assy to the hole on the roof, and place the antenna cord on the cutout of the antenna nut.
- install the amplifier antenna assy with the antenna nut.
Torque: 4.5 Nvm (46 kgfvcm, 40 in.Vlbf)
5. Install roof headlining assy
6. Install rear seat back assy (fixed type rear seat)
7. Install rear seat back assy (separated type rear seat)
8. Install bench type rear seat cushion assy


Other materials:
When the contact is empty
You can transfer the phone numbers in a Bluetooth® phone to the system.
Operation methods differ between PBAP (Phone Book Access Profile) compatible
and PBAP incompatible Bluetooth® phones. If the cellular phone does not support
either PBAP or OPP (Object Push Profile) service, you cannot tra ...
Inspection procedure
1 Check p/t squib(rh) circuit(airbaga sensor assy center – front
seat outer belt assy rh)
Disconnect the negative (–) terminal cable from the battery,
and wait at least for 90 seconds.
disconnect the connectors between the airbag sensor
assy center and the seat belt pretensi ...
On–vehicle inspection
1. Check basic function (manual operation function)
turn the ignition switch on.
Check that the door glass moves up when each window switch of the
regulator master switch
assembly is turned up and moves down when each window switch is turned down.
Check that the do ...