Toyota Corolla (E120): Inspection
1. Inspect sliding roof limit switch
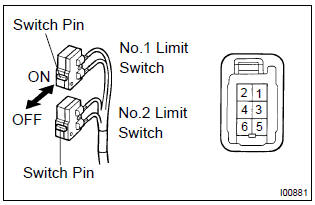
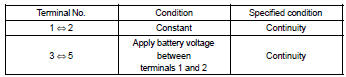
- Inspect the sliding roof limit switch continuity.
Standard:
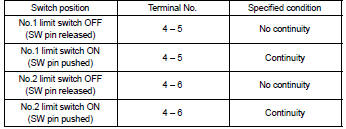
If the continuity is not as specified, replace the switch.
2. Inspect sliding roof drive gear sub–assy
- Connect the positive (+) lead from the battery to terminal 2 and the negative (–) lead to terminal 1, and check that the motor turns clockwise (moves to the close side).
- Reverse the polarity, check that the motor turns counterclockwise (moves to the open side).
If the operation is not as specified, replace the motor.
3. Inspect sliding roof motor circuit breaker
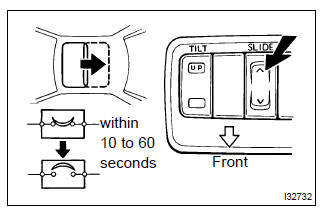
- With the sliding roof in the fully opened position, hold the sliding roof switch in the ”open” side and check that there is circuit breaker operating noise within 10 to 60 seconds.
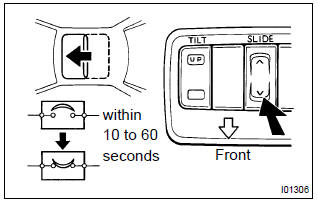
- With the sliding roof in the fully opened position, hold the sliding roof switch in the ”close” side and check that the sliding roof begins to close within 60 seconds.
If the operation is not as specified, replace the motor.
4. Inspect power main relay
- Remove the power window relay from the instrument panel j/b.
- inspect the power window relay.
Standard:
If the result is not as specified, replace the relay.


Other materials:
Emission inspection and maintenance (I/M) programs
Some states have vehicle emission inspection programs which include OBD (On
Board Diagnostics) checks. The OBD system monitors the operation of the emission
control system.
If the malfunction indicator lamp comes on
The OBD system determines that a problem exists somewhere in the emission cont ...
Pre–check
1. Selecting compass display mode
the compass switch allows you to select the display or non–display
mode of the compass.
2. Setting zone
deviation between the ”magnetic north” and ”actual north” differs
depending on the location. Therefore,
adjustment of the ...
Evap monitor (vacuum pressure monitor) (continued)
Preconditions
The monitor will not run unless:
mil is off.
Fuel level is approximately 1/2 to 3/4.
Altitude is 7800 feet (2400 m) or less.*
Engine coolant temperature (ect) is between 40°f and 95°f (4.4 °C and 35
°C).
Intake air temperature (iat) is between 40°f and 95 ...